STDEV and its related functions allow you to determine the standard deviation of a data sample or data set, measuring the variation between those numbers against the average. To help you work out how to use standard deviation in Excel, we’ll explain how to use it in this step-by-step guide.
Phrases like standard deviation put fear into the hearts of nervous mathematicians worldwide, but the concept is pretty simple. Standard deviation takes a range of data and determines how far each value is separated from the average of the total.
Rather than work this out manually, you can use functions like STDEV, STDEV.S, and STDEV.P instead. In this guide, we’ll explore:
- What is the STDEV function and what is it used for?
- How does standard deviation work in Microsoft Excel?
- Things to consider before using standard deviation in Excel
- How to use STDEV or STDEV.S in an Excel formula: A step-by-step guide
- Using STDEVA, STDEV.P, or STDEVPA for standard deviation in Excel
If you want to understand how to calculate standard deviation in Excel, this guide will help. Let’s get started.
1. What is the STDEV function and what is it used for?
To help explain standard deviation functions like STDEV and STDEV.S in Excel, we’ll give you an example. Let’s assume that you have a group of 10 people and you’re interested in learning what the average height of the group is.
You could use the AVERAGE function to determine the average height—so far, so good. However, what if there are outliers in the data? What if you wanted to determine the variance (the typical difference between the average height and the data set)?
This is standard deviation at work, letting you see the spread of values in a data sample or data set. You can learn more about standard deviation (and how it differs from standard error) in this guide.
Using STDEV or STDEV.S in Microsoft Excel
Just like the SUBTOTAL function and other Excel functions, the STDEV function exists to serve a single purpose: to allow you to calculate standard deviation in an Excel formula. However, while STDEV is perfectly suitable for the task, Microsoft has replaced it with a newer function: STDEV.S.
There isn’t much difference between STDEV and STDEV.S, with both having the same arguments and working in the same way. With no guarantees that Excel will continue to support STDEV in newer releases, however, it’s probably best to use STDEV.S to calculate the standard deviation from a data sample.
If you’re trying to calculate standard deviation from a population data set, you’ll need to use the closely-related STDEV.P function (or the older STDEVP which, like STDEV, is no longer recommended). Population, in this context, means an entire data set, rather than a sample (section) of it.
You can also use STDEVA to work with data that contains text or logical values (like TRUE or FALSE). By default, text and logical values are ignored by STDEV.P and STDEV.S.
2. How does standard deviation work in Microsoft Excel?
As we’ve explained, standard deviation works by determining the total variance between the average of a range of numbers and the numbers themselves.
For instance, if you had a range of cells containing the same number, the standard deviation would be zero: there isn’t any variation at all. In contrast, if you had a range of cells that contained numbers that all had a variation of one (for instance, 10, 11, or 12), then the standard deviation would be one, too.
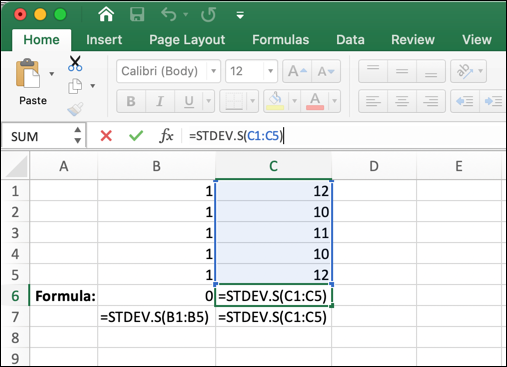
This makes the standard deviation functions (STDEV, STDEV.S, STDEVP, STDEV.P, STDEVPA and STDEVA) incredibly useful for potential data analysts, helping to determine the outlier values in a data sample or population set.
Each of these standard deviation functions work in a similar way. For instance, if you want to determine standard deviation from a data sample using STDEV.S, you’d need to use the following structure:
=STDEV.S(number1,number2, …)
All standard deviation functions (STDEV, STDEV.S, STDEVP, STDEV.P, STDEVPA and STDEVA) in Excel must contain at least one argument: number1. In this example formula, number1 refers to the cell range containing your data set. If you want to use numbers within the function directly, number1 would refer to the first number in that range.
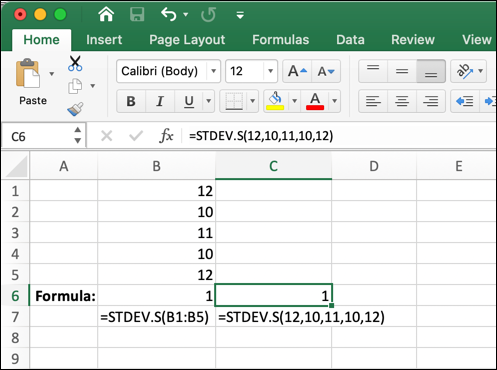
Each additional number argument is used to add additional numbers or cell ranges to the overall standard deviation calculation. You can mix and match these, adding numbers and cell ranges.
3. Things to consider before using standard deviation in Excel
Before you use Excel to calculate standard deviation using STDEV, STDEV.S, or another related function, you’ll need to be aware of some important quirks and limitations. These include:
- STDEV has been superseded by STDEV.S, so if you’re creating new formulae, you should use STDEV.S. Likewise, STDEVP has been replaced by STDEV.P for standard deviation calculations using an entire data set (or population).
- If you’re creating a standard deviation formula using STDEV, STDEV.S, STDEV.P, STDEVPA or STDEVA, you can use numbers, cell references, and arrays for the number arguments.
- The STDEV and STDEV.S functions in Excel use Bessel’s correction (n-1) to combat estimation bias due to the smaller sample size, compared to the entire data set. For entire population sets, where this isn’t an issue, use STDEV.P, STDEVPA or STDEVA, where n (rather than n-1) is used instead.
- For Excel to consider values that contain logical values (TRUE/FALSE) or text strings, you’ll need to use the STDEVA or STDEVPA functions. All other standard deviation functions (including STDEV.S and STDEV.P) ignore these values.
- Only one number argument (number1) is required. You can add up to 255 number arguments (containing numbers or cell references) in any standard deviation formula in Excel.
4. How to use STDEV or STDEV.S in an Excel formula: A step-by-step guide
To determine the standard variation of a data sample using STDEV or STDEV.S in Excel, you’ll need to follow these steps:
Step 1: Select an empty cell
You’ll need to begin by opening the Excel spreadsheet containing your data (or a blank spreadsheet if you’re inserting your numbers into the formula manually). Start by selecting an empty cell and, once the cell is selected, press the formula bar below the ribbon bar.
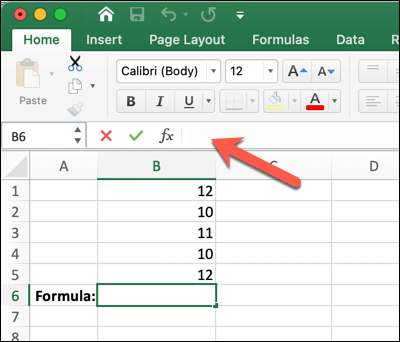
Once the formula bar is active (the blinking cursor will appear), you can begin to insert your new STDEV.S function, typing =STDEV.S( with an open parenthesis. If you’re using the older STDEV function, type =STDEV( instead.
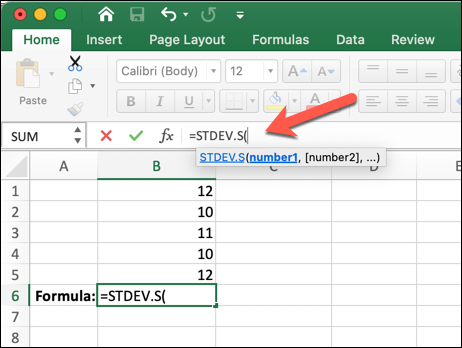
Step 2: Insert your initial number or cell reference
Adding =STDEV( or STDEV.S( into the formula bar will begin the formula creation process. A hint, showing the available formula arguments, will appear in a box directly beneath the formula bar.

Using this syntax and structure (and as explained above), begin to insert your data, adding at least one number argument to the formula. If you want to insert numbers into the formula directly, type these (one after each other), separating each value with a comma.
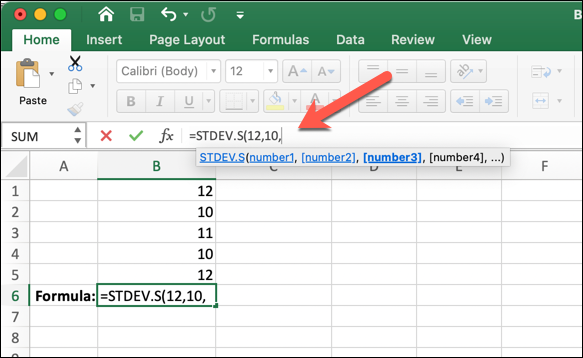
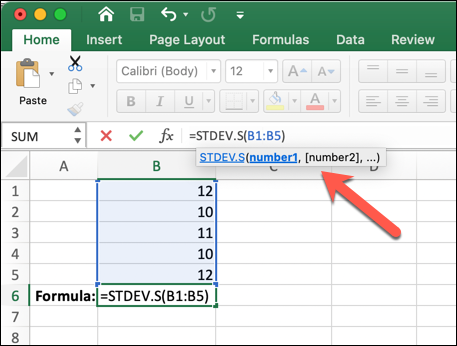
You can also use a cell reference for the number1 and additional number arguments. This can be done by inserting it manually (eg. B1:B5) or by selecting the cells with your mouse or trackpad.
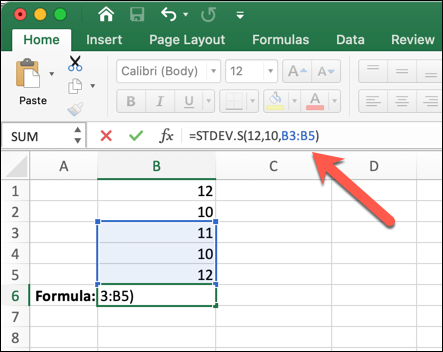
It’s also possible to mix and match cell references and numbers. STDEV and STDEV.S will determine the standard deviation from the data set as a whole. Once you’re happy with the formula, close it with a closing parenthesis.
STDEV and STDEV.S will ignore any values that contain numbers or logical values (TRUE or FALSE). If a range of cells contain no numbers, Excel will return a #DIV/0 error message.
5. Using STDEVA, STDEV.P, or STDEVPA for standard deviation in Excel
The STDEV and STDEV.S functions are useful for sample data sets that contain standard numbers. If you’re working with data that contains text, logical values, or if you want to find the standard deviation from an entire population data set, you’ll need to use STEDVA, STDEV.P, or STDEVPA instead.
Using STDEVA or STDEVPA
If you want to create a standard deviation formula that considers logical values (TRUE or FALSE) or text strings, then you’ll need to use STDEVA or STDEVPA instead. Use STDEVA for a sample data set and STDEVPA for an entire population set (where estimation bias is much less likely).
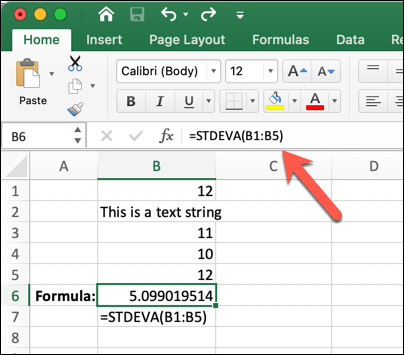
Both STDEVA and STDEVPA work much like the STDEV and STDEV.S functions, with the same arguments and structure:
=STDEVA(number1,number2, …)
=STDEVPA(number1,number2, …)
The only difference is how Excel considers cell references or entries that contain text or logical values. For instance, if you have a cell range (A2:A9) and two of the cells contain text, the value of those cells is counted as zero, as is FALSE. For TRUE, STDEVA and STDEVPA count it as the value 1.
Using STDEV.P
Likewise, for the STDEV.P function, the only difference is the method Excel uses to determine the variance. For smaller samples, Bessel’s correction is used as the method, where the method n-1 is used (n referring to the number count). This helps to overcome bias issues in estimating the variation using a smaller sample size.
If you’re using an entire data set, then you don’t need to use this method to overcome potential estimation bias. Rather than using STDEV or STDEV.S (where S means sample), it’s better to use STDEV.P (where P means population, or the entire data set).
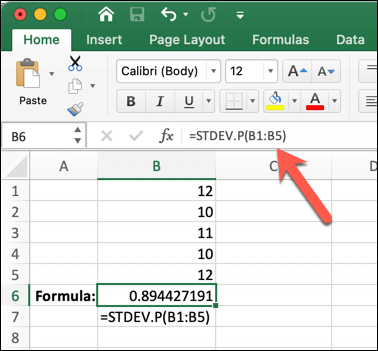
The arguments and structure remain the same, as follows:
=STDEV.P(number1,number2, …)
This will ignore text and logical values, so be sure to use STDEVPA instead if this is a requirement. You can also use the outdated STDEVP function, but there are no guarantees that this will remain available in future Excel releases.
Final thoughts
Standard deviation is a tricky mathematical concept made easy by functions like STDEV, STDEV.S, STDEV.P and others in Microsoft Excel. If you’re struggling, you can create a pivot table to determine the standard deviation of a data sample or set instead.
Excel has all kinds of functions, formulae, and features that can make data analysis a little easier. If you want to learn more, here are 10 essential Excel formulas for data analysts to use. You can also take our five day short course for new data analysts to get to grips with data a little easier. You might also find these Excel tutorials useful:
