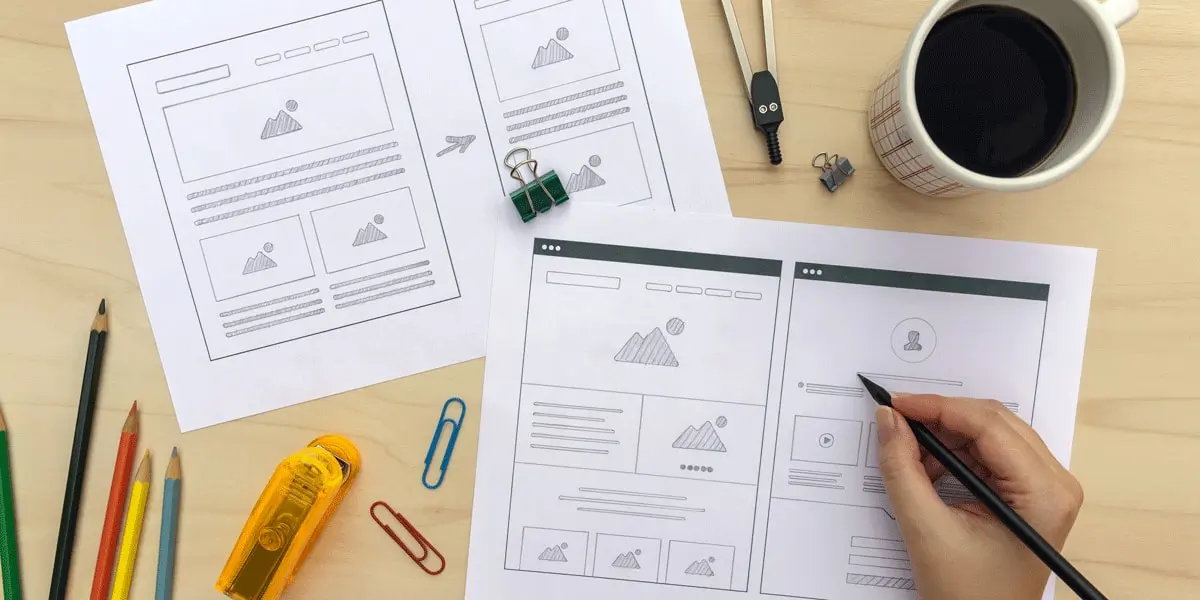
Wireframing is one of the best ways to test your product concept without significant expenditure of time and resources. But how do you actually wireframe for mobile apps and websites, and how do the processes differ?
While a website can be rendered using HTML, apps are downloaded and installed on your mobile device as applications instead of rendered within a browser. In this comprehensive guide, we’ll take you through everything you need to know about wireframing for mobile apps and websites, starting with a quick refresher on wireframing and where it sits in the product design process. We’ll then go through the steps, logistics and key considerations when creating your wireframes.
By the end of this article, you should be well on your way to wireframing up a storm. Here’s what we’ll cover:
- What is wireframing?
- General wireframing best practices
- How to wireframe for mobile apps
- How to wireframe for websites
- Wireframing for mobile apps vs websites: What’s the difference?
- Conclusion
1. What is wireframing?
To get us started, let’s look at what a wireframe actually is and how it fits into the product design process.
A wireframe is a static low-to-mid fidelity simulation of the product concept, depicting the skeletal framework of a webpage or app. Wireframes provide a clear outline of the page structure, layout, information architecture, and overall direction. Traditionally created in greyscale (without the use of color), wireframes can be hand-drawn with pen and paper, or digitally using design software.
Wireframing is the most efficient way to test your product concept and define your user journey, making it an essential step in the product design process. Wireframes enable designers to quickly explore layout and interaction concepts to gather valuable insights from user and stakeholder feedback.
A wireframe effectively acts as a jumping off point for the product design process, before iterating into later phases where the user interface will be optimized with color, typography, or iconography. Keen to learn more? Head over to our definitive guide to wireframing.
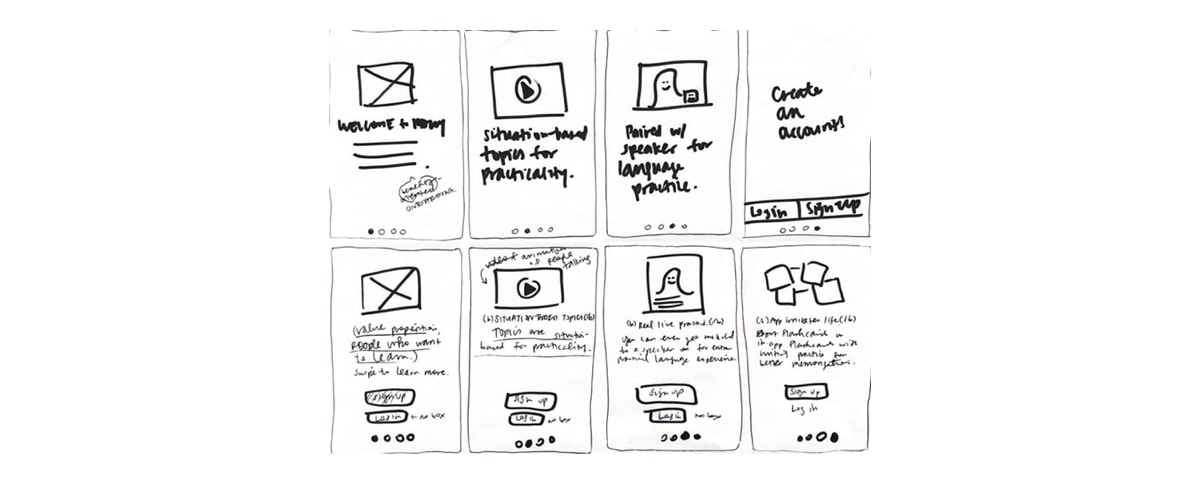
Source: Katherine Lu’s portfolio
2. General wireframing best practices
Do your research
Before you put pen to paper, you’ll first need to conduct some base level research to refine your product concept. Who are you creating this app for, and why? What problem does your app mean to solve? How will your app stand out from your competitors?
Answering the above questions won’t require you to go into loads of detail, nor will it necessitate the use of elaborate user research tools. It could be as simple as downloading similar apps, seeing how they feel, and identifying opportunities to improve on your competitors. Can you see patterns that work? Who is offering the most elegant solution?
Don’t have an interview panel that has been vetted by a research team? No problem. Conduct some informal (but still valid) user testing by asking around. Check in with friends, family or even strangers that fit the general profile of your target users, or create a casual survey to learn more about how people are using websites or apps similar to yours.
Map out your user flow
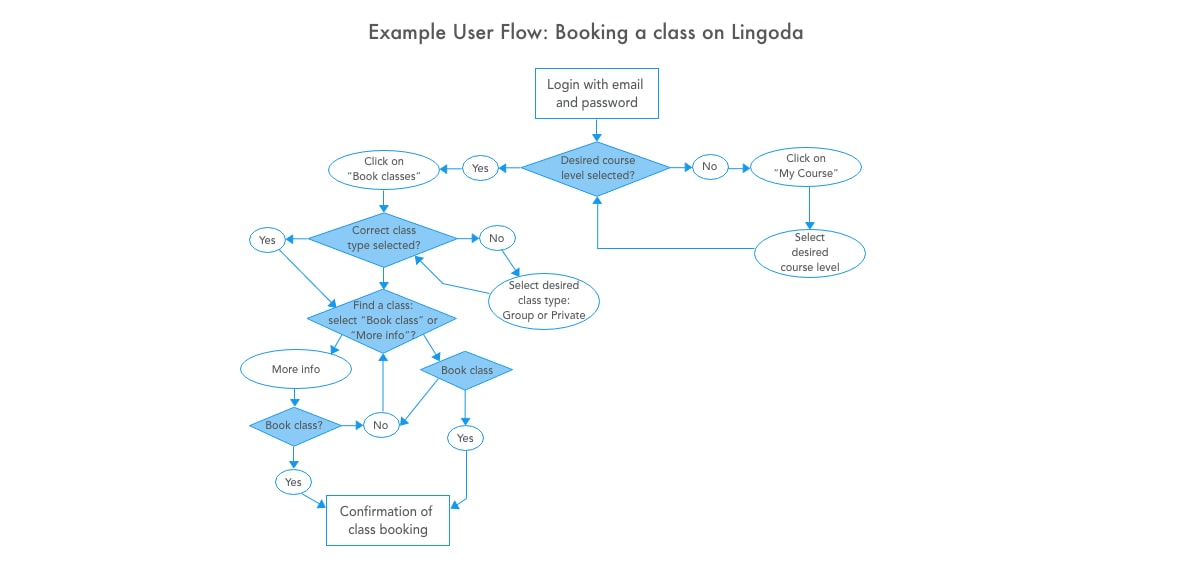
Now that you’ve completed your research, it’s time to map out your user flow. User flow refers to the pages, steps, and actions a user needs to take to complete a meaningful goal. Which marketing channel will your users be coming from? What messaging is required for them to complete a particular task?
How will you show success and failure states? The further into the product design process you get, the harder it is to address these questions and adapt the user flow. Mapping out your user flow will help you to decipher how many screens you’ll need to produce and the flow you expect the user to follow.
A user flow often takes the form of a simple flow chart, such as the one below.
Choose the right tools
If you’re working alone, wireframing using pen and paper will more than suffice. But if you’re part of a bigger team with multiple stakeholders in the mix, it’s much more fitting to create a digital wireframe that can be easily shared—and won’t get accidentally deleted, lost, or disintegrated in a coffee stain. Remember: if you lose your wireframe, you’ll lose your core foundational ideas!
Taking advantage of modern design tools such as InVision, Balsamiq, and Sketch can save you heaps of time during the wireframing stage. Balsamiq allows designers to build wireframes, largely disregarding the aesthetic quality of the user interface in favor of the layout, intuitive interaction design, and basic information architecture. Both Sketch and Axure allow designers to define styles that will update every artboard, thus speeding up the process.
Function over form
When creating wireframes, it’s easy to fall into the trap of being too meticulous. Remember: wireframes are a tool for garnering feedback and approximating what the core features of an app or website will be, not creating a perfect simulation of the final product. Any branding, color, iconography or font work should be saved for later iterations of the product’s design.
Wireframing in greyscale will omit any distractions imposed by color or fontwork. This isn’t to say that you can’t play around with shading! You can still use contrasting shades to gauge the user’s visual journey, and dictate where their eyes are naturally drawn to.
A tertiary call to action, for example, might be shaded in light grey—whereas a more important button might be colored in 100% black. The occasional use of colors like red or green is acceptable to indicate success and failure states (just don’t go overboard!).
Tempting as it may seem, spending hours playing with custom fonts is uncalled for. When wireframing using tools like Sketch or Figma, stick to the system default fonts. This will ensure the text is legible, and the wireframe is clear and consistent.
3. How to wireframe for mobile apps
Now that we’ve gotten to grips with some general wireframing best practices, let’s look at the specific design heuristics to bear in mind when wireframing for mobile apps.
Finger-friendly designs
When wireframing for a mobile app, making sure you’re adhering to both iOS and Android platform standards is crucial. Before you even begin wireframing, make sure that your artboard is set up with the correct ratios.
It’s equally important to ensure your wireframes are conforming to industry standard tap target sizings. Tap targets refers to any element on a touchscreen device that a user interacts with using their finger. This includes anything from a link to a button—or even a form.
The tap target needs to be big enough to accommodate the average size of a fingertip, while also being surrounded by enough space that the user can tap the desired target without accidentally tapping on something else (we all know how frustrating that can be.) Unsure of where to start? Companies like Google have created tap target size guides in their design system ‘Material Design’ that have become industry guidelines when designing products for mobile.
Meticulous as it may seem, these early inclusions will allow you to gauge how the product you’re wireframing “fits” within the standards of that platform. Bear in mind, however, that your mobile app wireframe can still be any size.
Screen size limitations
Okay, so we’ve established that phones are smaller than desktops. Quite a lot smaller, for that matter. Of course, a wireframe is simplistic by nature anyway—but particularly when wireframing for mobile apps, less is more. Having a small interface with limited space means your design needs to be compact, with a clear, obvious navigation.
That’s not to say the design has to be explicitly minimalist, but a cluttering of features could result in an ‘endless scrolling’ situation—and no one wants that. Typing on a mobile is equally frustration-inducing, so make sure you’re wireframing for a minimal amount of user input by keeping forms as short as possible.
For pages with a dense amount of informational content, you might want to using collapsable menus known as accordions. This is a technique called “progressive disclosure” where important details can be hidden from view within a headline, which can then be tapped or clicked to reveal the contents.
Mobile interaction conventions
As mobile phones are designed to be used with two hands, this enables some specific gestures that you wouldn’t find using a desktop computer. In addition, a mobile phone’s lock screen introduces some unique interaction opportunities. For example, notifications can be expanded using two fingers to see a preview of the contents, and reveal key calls to action.
How will your push notifications be enabled, and how will they be timed? How will the users interact with the app while offline? How will you encourage your users to allow permission to use the location, camera or photo access? Will declining permission mean your user will miss out on key parts of the experience? How will you convey that message?
Time to test!
Now that your mobile app wireframe has been created, it’s time to test! Obtaining user feedback via user testing is pretty much the core goal of wireframing. Testing your mobile app wireframe will allow you to identify any points of friction, decipher the ease of your app experience and gauge whether your screen flow matches up with the user’s expectations.
With tools like InVision, designers can easily make their wireframes interactive by connecting screens and linking actions to simulate their basic app experience for the users.
After the users opened the app, was the access to the main menu obvious? Did they have to tap ‘back’ for any of the tasks they wanted to achieve because the path wasn’t intuitive? Were there any features that felt redundant or obtrusive? Asking these questions will help you to refine your app experience, and iterate faster to a more detailed prototype.
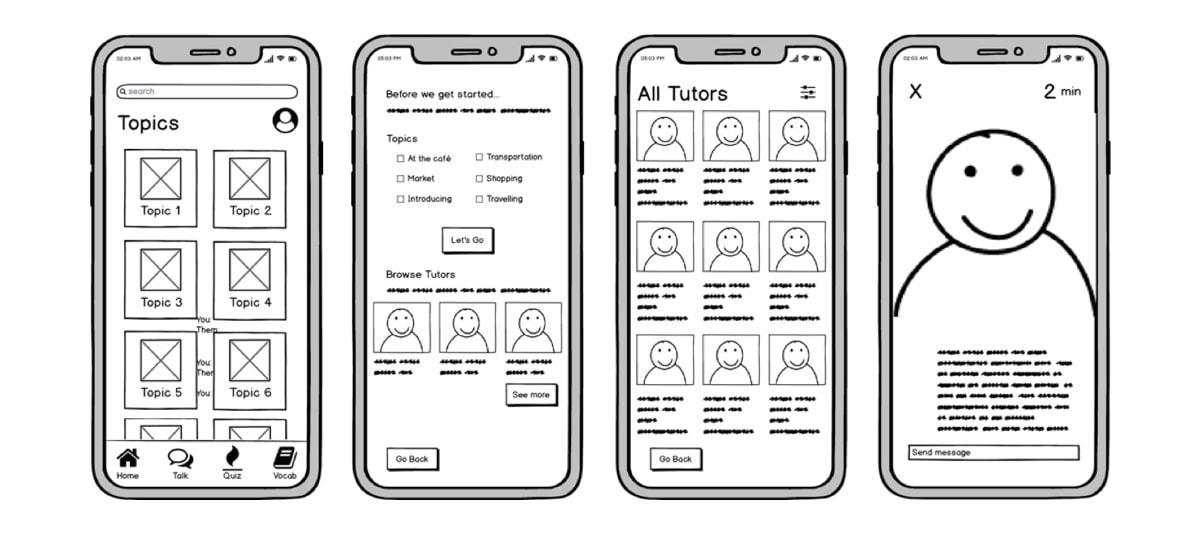
Source: Katherine Lu’s portfolio
4. How to wireframe for websites
Now that we’ve looked at wireframing for mobile apps, let’s look at what needs to be considered when wireframing for websites.
Nail your messaging
Messaging is a crucial building block in the website wireframing process. It’s imperative to determine what information you’re going to display on the page, and how that information is going to flow. Before you start incorporating your messaging into your wireframe, take a blank piece of paper and figure out what story you want each page to tell, and which piece of information should take priority over any other.
This exercise will enable you to nail the flow of your messaging and determine the goal of each page. It’s tempting to throw ‘Lorum Ipsum’ into your wireframes and be done with it, but the more time you spend nailing your messaging during the wireframing stage, the less time you have to spend on it later.
Friction interferes with user confidence, and it pays to spend some time omitting any friction in your wireframes. The more friction-reducing elements you have on a page, the greater the number of conversions will be. Some friction-reducing features include shorter sentences, and sentence and paragraph structures that consider how people read on the web (F-shaped eye-path, reading pattern and easily-scannable bullet points).
Pro tip: don’t skimp on microcopy! Microcopy is the tiny bit of text that can assist in putting to rest the concerns of your users—such as the text on a form that explains to your users what specific information certain fields are asking about, or that sentence that reassures the user that moving to the next step is a good idea.
Dazzle with detail
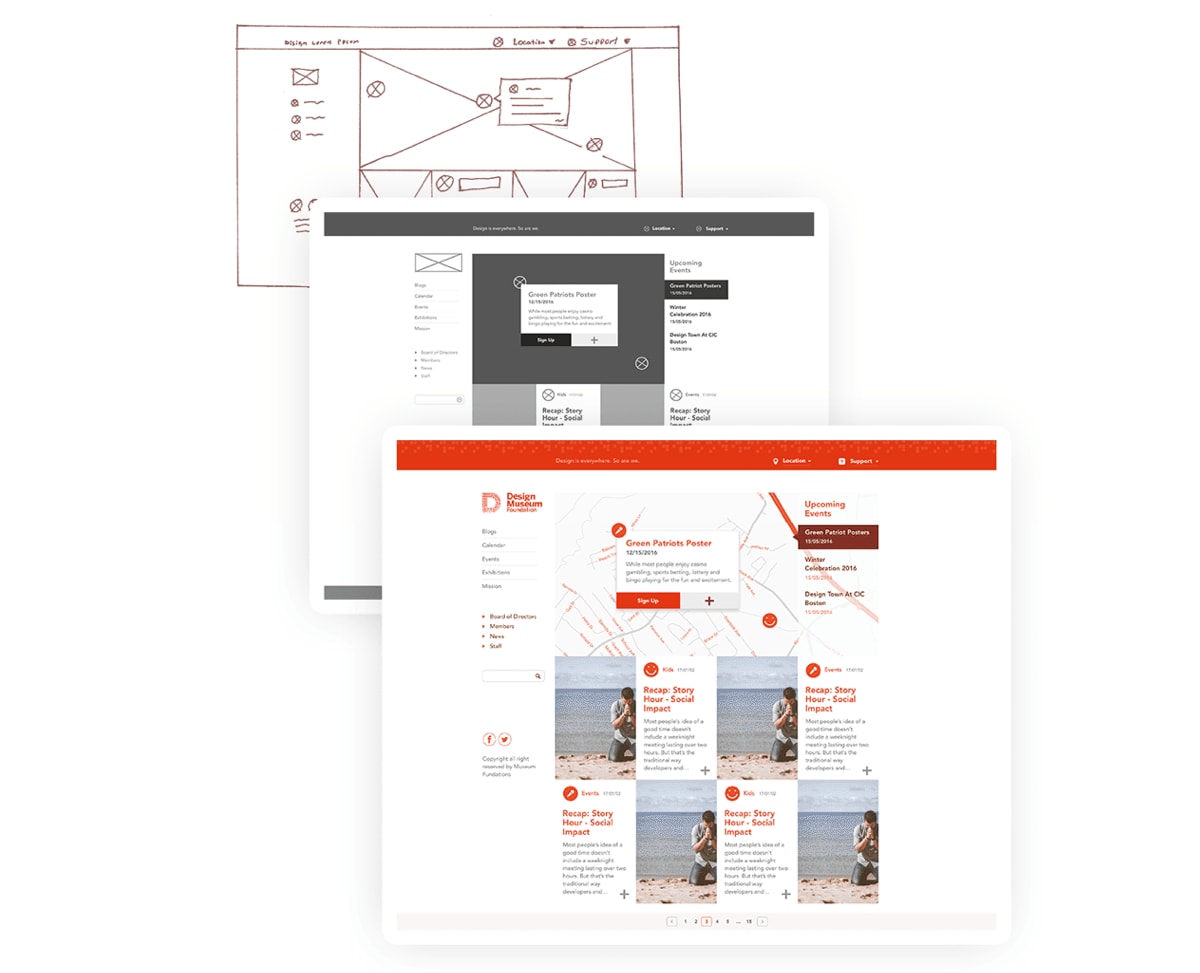
Once you’ve established your wireframe’s basic messaging flow, it’s time to add some detail. You’ll need to define your layout and spacing, usability conventions (such as placing the navigation on top next to your logo, adding a tagline, or placing the search box on the top right) and information hierarchy.
Which messages need to be emphasized using font size? What type of images might help convey the message? Where would you place trust-building elements, such as user reviews or testimonials? Make some annotations in your wireframe to help your users understand where interactive elements might be placed.
Multi Modality
Consider that the same user might switch devices for very specific ways to continue their experience.
For example, users might first encounter content while on a mobile device because they discovered a link via social media. Later, they might switch to the website to do more in-depth research and make a purchase. Another example is browsing media content on a mobile app and then streaming (or casting) the content to a media device such as TV, console or speakers.
Layout choices that work on a website might get broken on a mobile, such as panels within panels which can result in multiple scroll bars on the screen, so you should consider mobile-specific layouts—even when wireframing for a website.
On a mobile, slashing overlays and dialogues, such as alerts, newsletter sign ups and special offers, can also cause frustration to users—so try and find a way around it!
Time to test!
Just like mobile app wireframes, it’s now time to test your wireframes with your users.
Source: Francis Pujols’ portfolio
5. Wireframing for mobile apps vs. websites: What’s the difference?
As we’ve seen, there are core wireframing principles that are applicable to both mobile apps and websites.
But the differences in sizing, the limitations imposed by dimensions and the way that the user interacts with both means there are some key differences to be considered.
Size
The size differences between mobile apps and desktop websites means special considerations when configuring content. Let’s look at an example.
Due to the screen width on a desktop website, your website wireframe might feature a layout that spreads over multiple columns. On a mobile app, the amount of columns is usually restricted to one or two columns maximum. This means that list pages that might traditionally be organized in a multi-column grid, such as the ones you might see on Amazon, iTunes, or Pinterest, will need to be re-configured and stripped down for mobile—meaning the user will see less items on the screen at once. You’ll need to decide whether they see an infinite scroll, or whether you want to decrease the number of items per page in order to display other content beneath.
Behaviour
The second core difference is the behavior of the mobile app or website. When designing for websites, the user can use a trackpad or mouse to explore the page and reveal additional pieces of information—such as menus or tooltips.
The user might even hover over certain interactions to reveal menus—whereas on a mobile app, this will require a tap to open. When wireframing for mobile apps, this means thinking more carefully about how you will encourage your users to tap a specific button to reach a specific goal.
Interaction
The way that users interact with mobile apps differs largely from how they interact on a desktop. The app may pull content and data from the Internet in a similar fashion to a website, but many apps also offer the user the option to download content for offline use. If this is the case for your application, you’ll need to wireframe for the experience accordingly.
The swipe right or left interaction, for example, is particular to mobile—made famous by dating app Tinder. This technique can be used on a mobile app when there are multiple images; showing the edges of other images to the right or left hints that you can swipe horizontally. This kind of interaction is less common on a website, as users tend to scroll up and down using a mouse.
6. Conclusion
By now, you should have a concrete understanding of the differences between wireframing for mobile apps and wireframing for websites.
While the core principles of wireframing—conducting user research, mapping out your user flow and relying on modern design tools—may be applicable to both platforms, the contrasting interactions a user has with each platform will ultimately lead to very different wireframing processes with different considerations.
For a website, a fair amount of time needs to be spent configuring layout and navigation. For a mobile app, limited space means omitting any content that isn’t essential.
Irrespective of the platform in question, wireframing is a crucial part of the product design process. Wireframing will allow you and your stakeholders to clarify which features will be included in the app, the placement of the elements, and how they interact with one another—meaning you’ll end up with a more purposeful design that really fits a need.
If you’d like to know more about wireframing for mobile apps and websites, check out these related blog posts:
