Introduction
Welcome back to the fifth (and final) lesson of your UI design short course! The course may be coming to an end, but remember—this is only the beginning of your journey towards a career in UI design.
In this tutorial, we'll be using color and imagery to bring our app screens to life. We'll get to know the basics of color theory, and learn how to work with colors and imagery in Figma. We'll also learn how to export and save your work to pass onto web developers and other key stakeholders.
By the end, you'll not only have a polished app screen to show off to friends and family—you'll also have a solid foundation in UI design knowledge to serve as a jumping-off point for your journey towards becoming a fully-fledged UI designer!
Here's what we'll be learning today:
- Introduction to color theory
- Color systems
- Choosing colors for your app
- Choosing imagery for your app
- Applying color and imagery in Figma
- Exporting and saving your work
Let's finish off strong!
1. Introduction to color theory
Color theory is the framework surrounding the use of color in art and design. Recognize the color wheel that pops up on most basic color tools? That's a modern version of Isaac Newton's color wheel, which he created back in 1666, and forms the basis of color theory.
The basic color wheel displays three categories of color:
- Primary colors: Red, blue, and yellow.
- Secondary colors: Orange, purple, and green
- Tertiary colors: Magenta, vermillion, violet, teal, amber, and chartreuse.
If you remember learning about these colors in your school's art class, you've already grasped the fundamentals of color theory!
The color wheel charts these colors and their respective hues, tints, tones, and shades. By being able to visualize how each color relates to the color next to it on the color wheel, designers can create bespoke color palettes that give the interface a balanced and harmonized aesthetic.
Let's look more closely at these color variants:
- Hue refers to the pure pigment of a color, without tint or shade. Any of the six primary and secondary colors is a hue.
- Shade refers to how much black is added into the hue. As such, shade darkens a color.
- The opposite of shade, tint refers to how much white is added to a color. As such, tint lightens a color.
- Tone is the result of a color that has had both white and black added to it.
- Color temperature refers to the warmth or coolness of a color depending on what colors have been added to it. Warm colors contain shades of yellow and red; cool colors have a blue, green, or purple tint; and neutral colors include brown, gray, black, and white.
2. Color systems
Color has two different natures: the tangible colors that can be seen on the surface of objects, and the colors produced by light. These two types of color are known as the additive and subtractive color systems. The third color system, called the HEX system, is concerned with digital colors.
Let's take a closer look at what they mean.
The additive color system (RGB)
RGB stands for red, green, and blue, and is based on the additive color model of light waves that dictates that the more color you add, the closer the color gets to white. RGB is primarily used on digital screens.
The subtractive color system (CMYK)
CMYK stands for cyan, magenta, yellow, and black, and it is commonly used in physical printing. CMYK obtains colors by the subtraction of light.
The HEX color system
The HEX color system is based on a 16-digit system that goes from zero to nine, followed by the letters a to f, where 0 is the lowest possible value and f the highest. These digits are used to produce a "HEX triplet" or six-digit combination of numbers and letters that represent a color called "HEX codes." Each pair of numbers in a HEX code represents the red, green, and blue components of each color.
In web design, every digital color has a HEX code. You can see the HEX code of a selected color in in Figma the image below (zoomed in on the Fill area in the right sidebar).

3. Choosing colors for your app
There's so much more to choosing colors for your app than simply picking your favorite colors. Before you dive into applying colors to your app screens, let's look at some key considerations to bear in mind:
Color psychology
To get you up to speed, let's take a look at some of the most common color associations below:
- Orange is energetic and warm.
- Red is associated with energy, war, passion, desire, and love.
- Yellow evokes positivity, youth, joy, playfulness, sunshine, and warmth.
- Pink evokes feelings of innocence and delicateness, gratitude, romance, softness, and appreciation.
- Blue is perceived as authoritative, dependable, and trustworthy.
- Green symbolizes growth, freshness, serenity, money, health, and healing.
- Black represents power, elegance, and authority.
These color associations are useful for deciding what you want your users to feel. For the Ethical Eater app, green, yellow, or orange might elicit emotions that are synonymous with ethical eating, vegetables, and veganism.
Contrast
User interfaces containing only shades from the same color family are unlikely to draw users' attention—and, moreover, run the risk of being a complete headache to navigate. Aim for a mild level of contrast and apply high contrasting colors only for elements that are supposed to stand out, such as call-to-action buttons.
Stick to UI conventions
When working with colors, it's easy to get carried away with aesthetics over practicality. Of course, it's great to be experimental—but challenging design conventions with edgy or trendy designs can end up giving your users a headache.
Some common UI design color conventions include:
- Using a dark color for text to ensure legibility
- Keeping light colors for backgrounds
- Using contrasting colors for accents (as mentioned above)
- Sticking to classic call-to-action colors—such as red for a warning sign
Sticking to these conventions will reduce the cognitive load for your users and allow them to navigate the interface intuitively.
Use the 60-30-10 rule
This popular interior design trick is a great way to keep your interface balanced. This formula dictates that:
- 60% of your website should be made up of your dominant hue
- 30% should be your secondary color
- 10% should be your accent color
Sticking to this formula will allow the eye to move comfortably from one focal point to the next.
4. Choosing imagery for your app
Putting imagery into your app screen isn't a requirement, but it's a great way to communicate your brand message. As with color, though, using images in your UI designs comes with a lot of consideration about your audience and what you want them to feel. Keeping images neutral, relatable, and diverse is a great way to increase engagement with your digital product.
Websites like Unsplash and Pixabay are useful resources when looking for free images for your UI design projects. Figma works with some great plugins to make adding images to your design process very easy.
If you think you need more specific or bespoke image, you could also try using an AI tool like Leonardo.ai that generates brand-specific images, pictures, product photography, and more. Just describe the desired image you’d like to feature on the welcome screen and Leonardo.ai will generate an option for you!
5. Working with colors and imagery in Figma
Now for the practical part! Let’s start with your Login button. Select the background shape of your log in button in the layers list in the left sidebar, or double click on it on the canvas.
Click on the color thumbnail under where it says Fill in the right sidebar. A small panel will pop up. Can you see a large colorful section? Well, that’s the Color Picker (remember, we looked at it in tutorial three?)
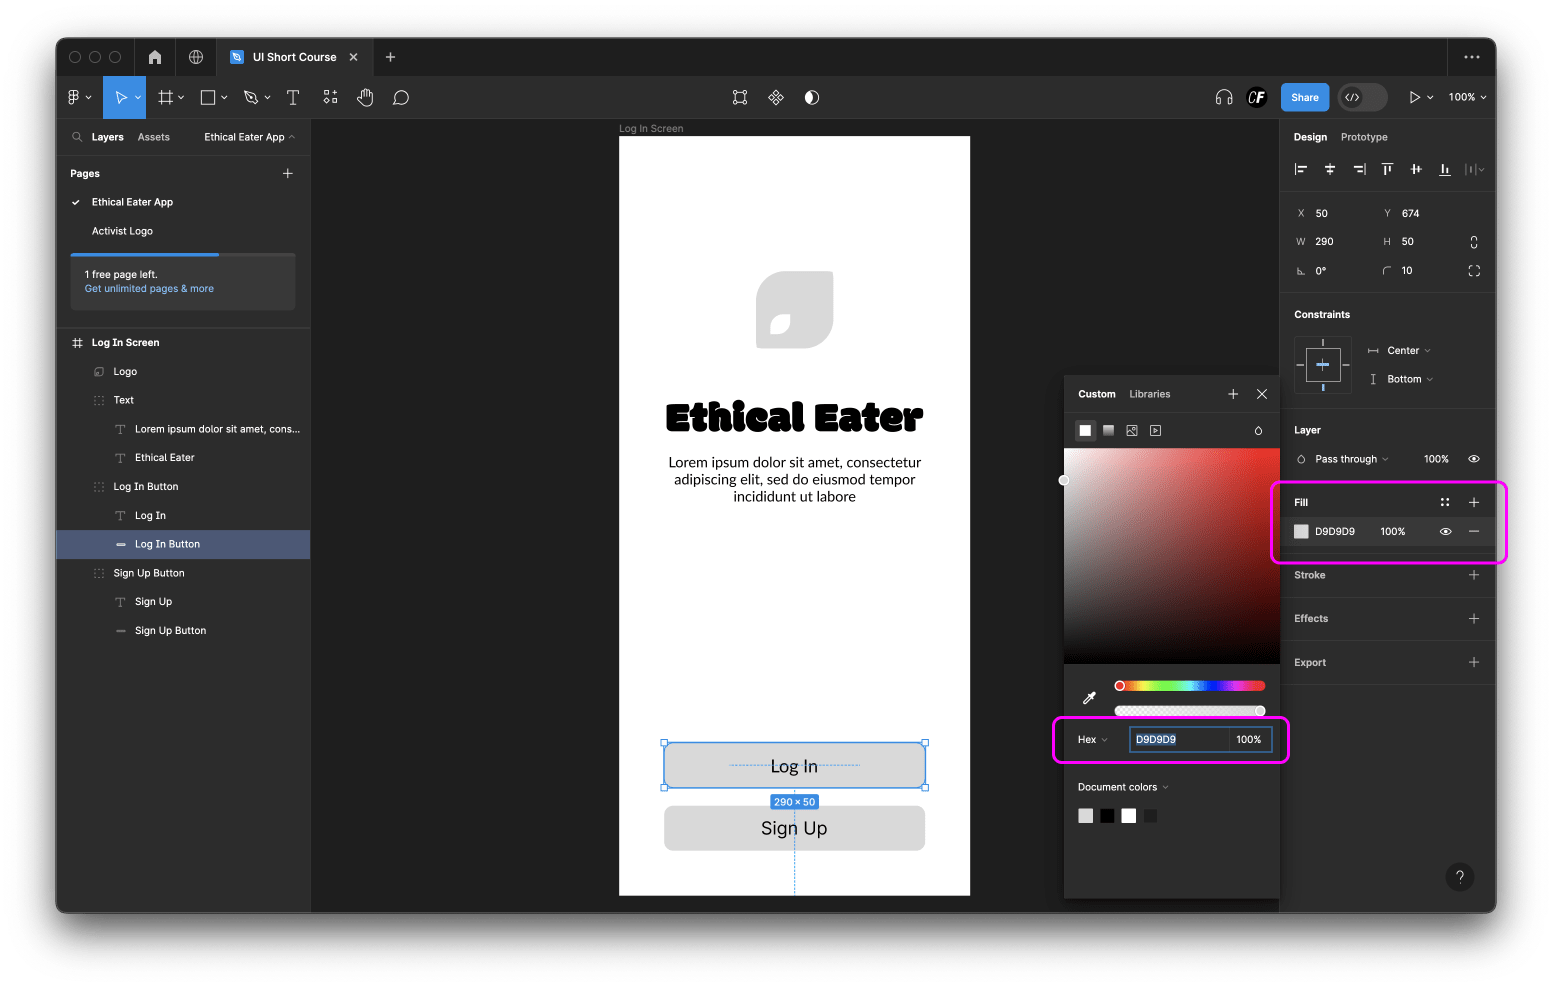
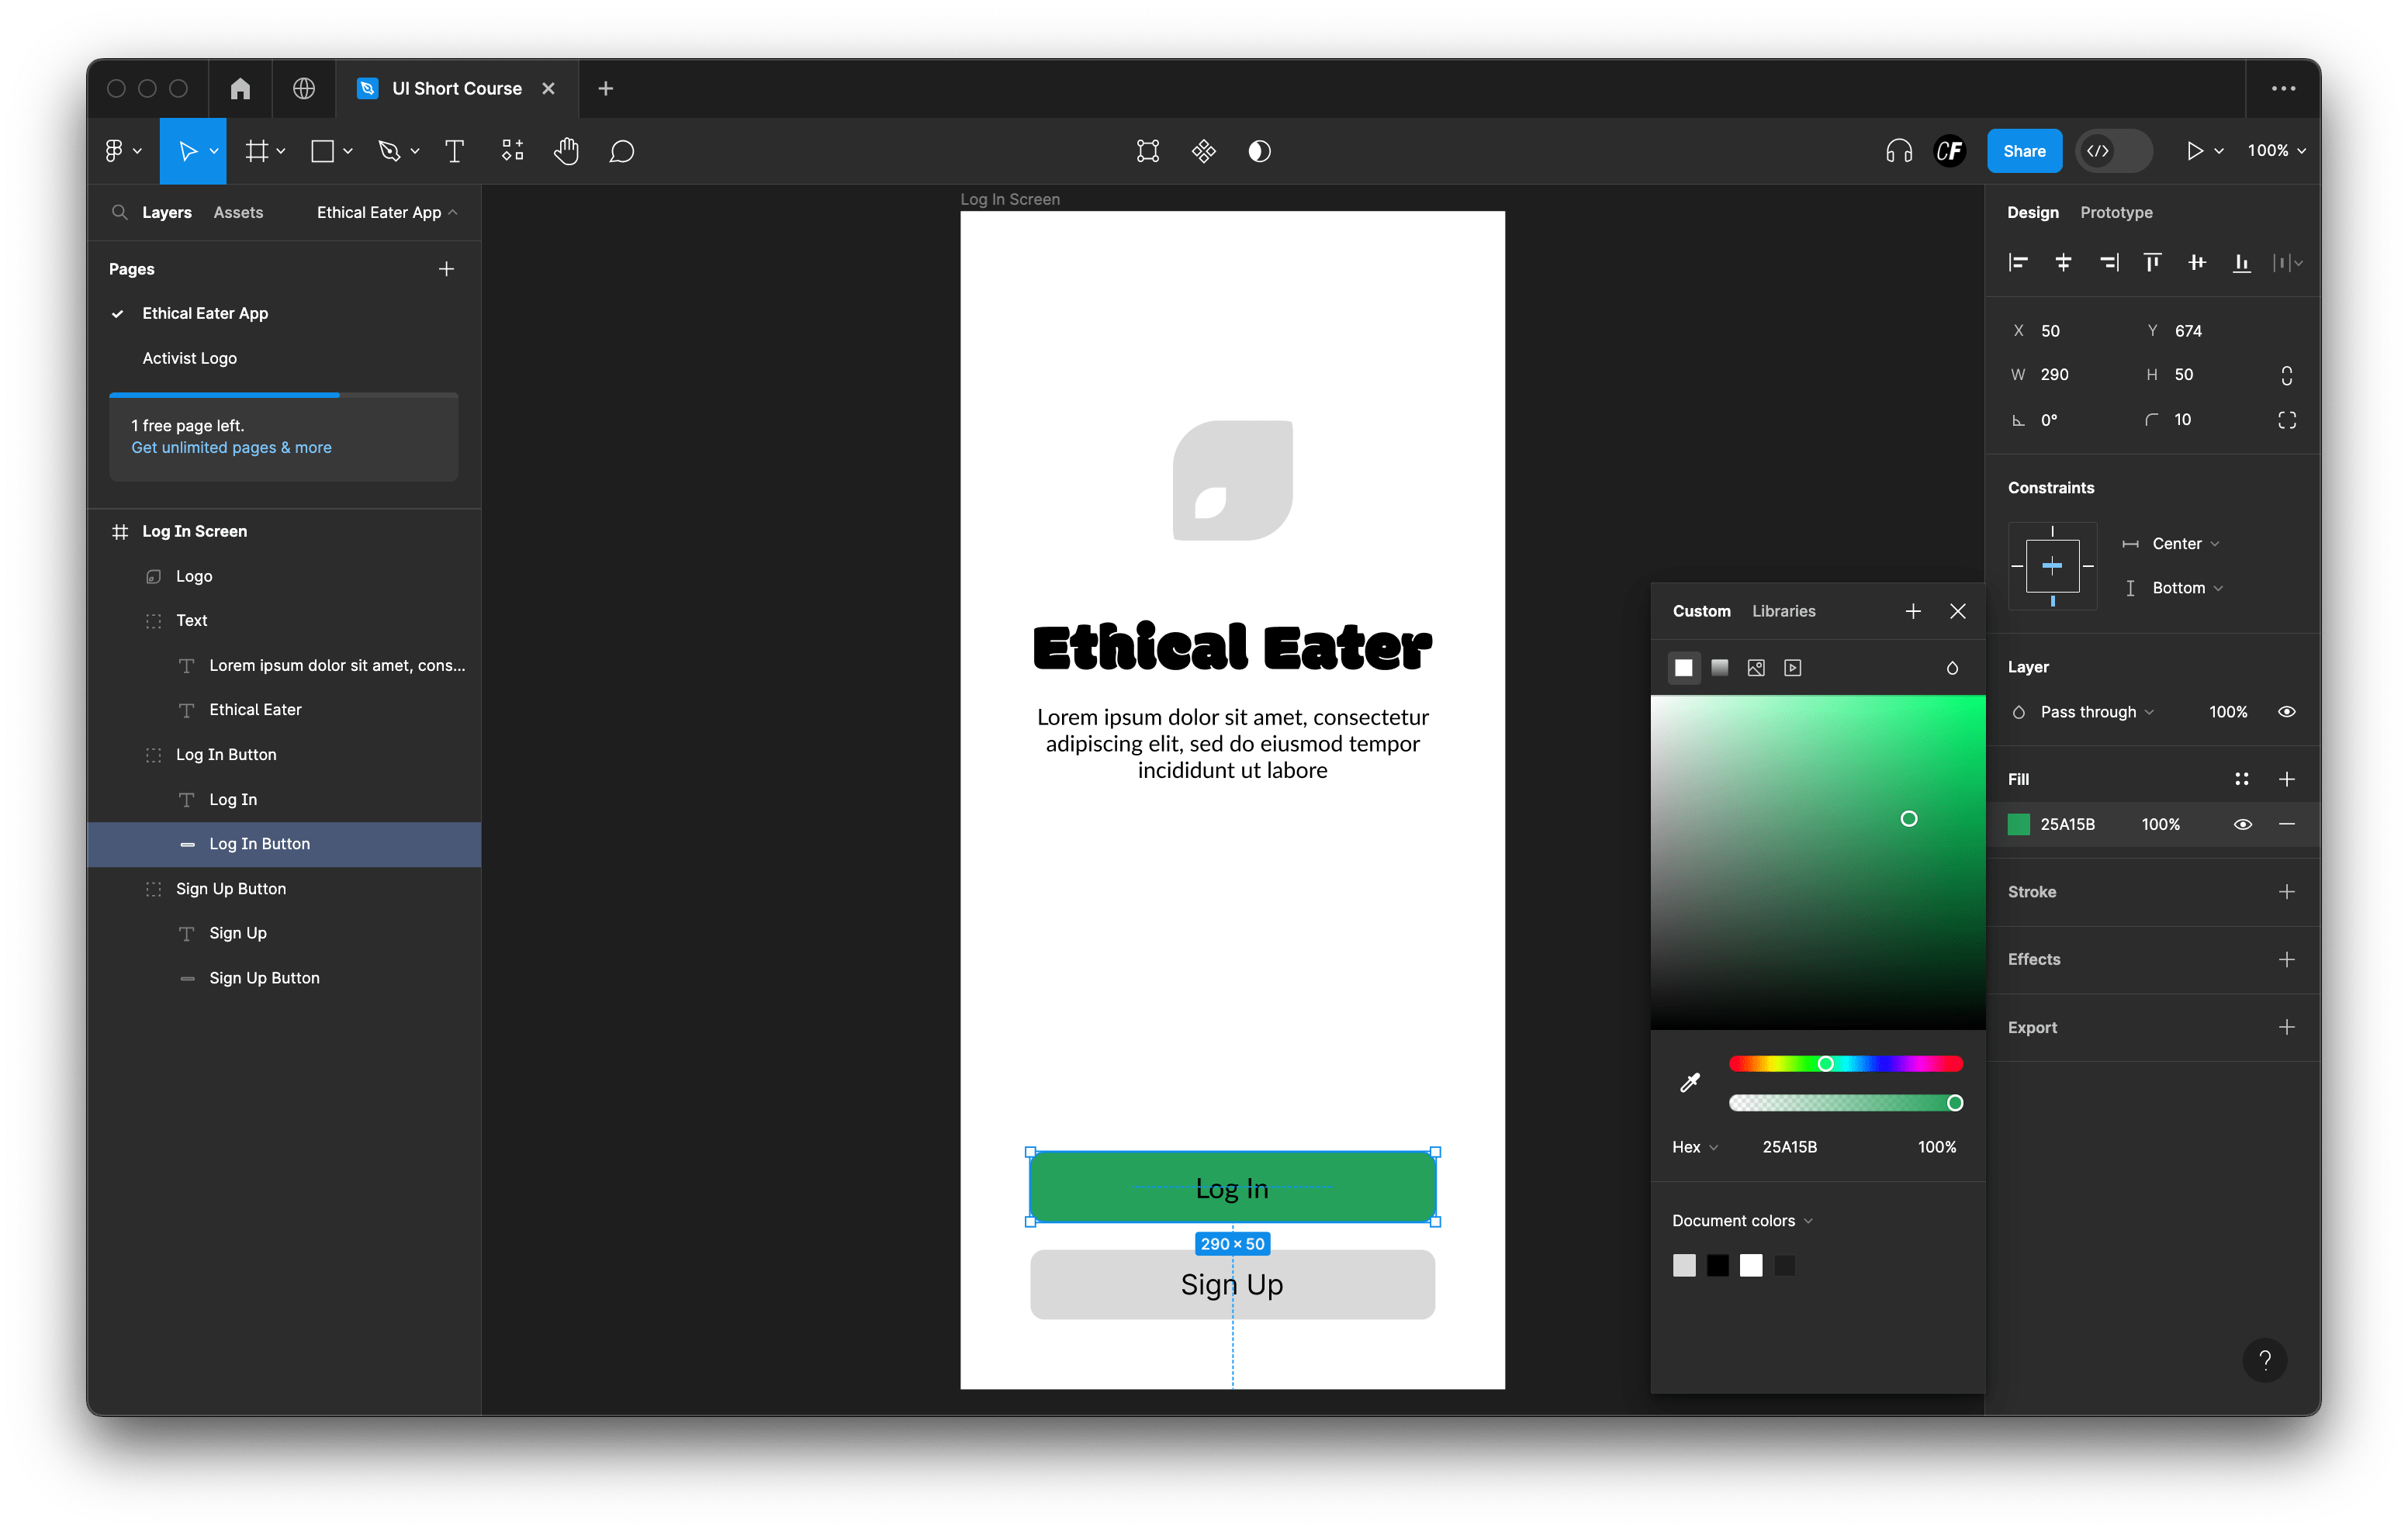
Clicking on any part of the Color Picker will change the color of a selected layer. You can also check the HEX code for your selected color under the Color Picker. We’ve made the button a shade of green with the HEX code #25A15B but feel free to add your own creative spin on it.
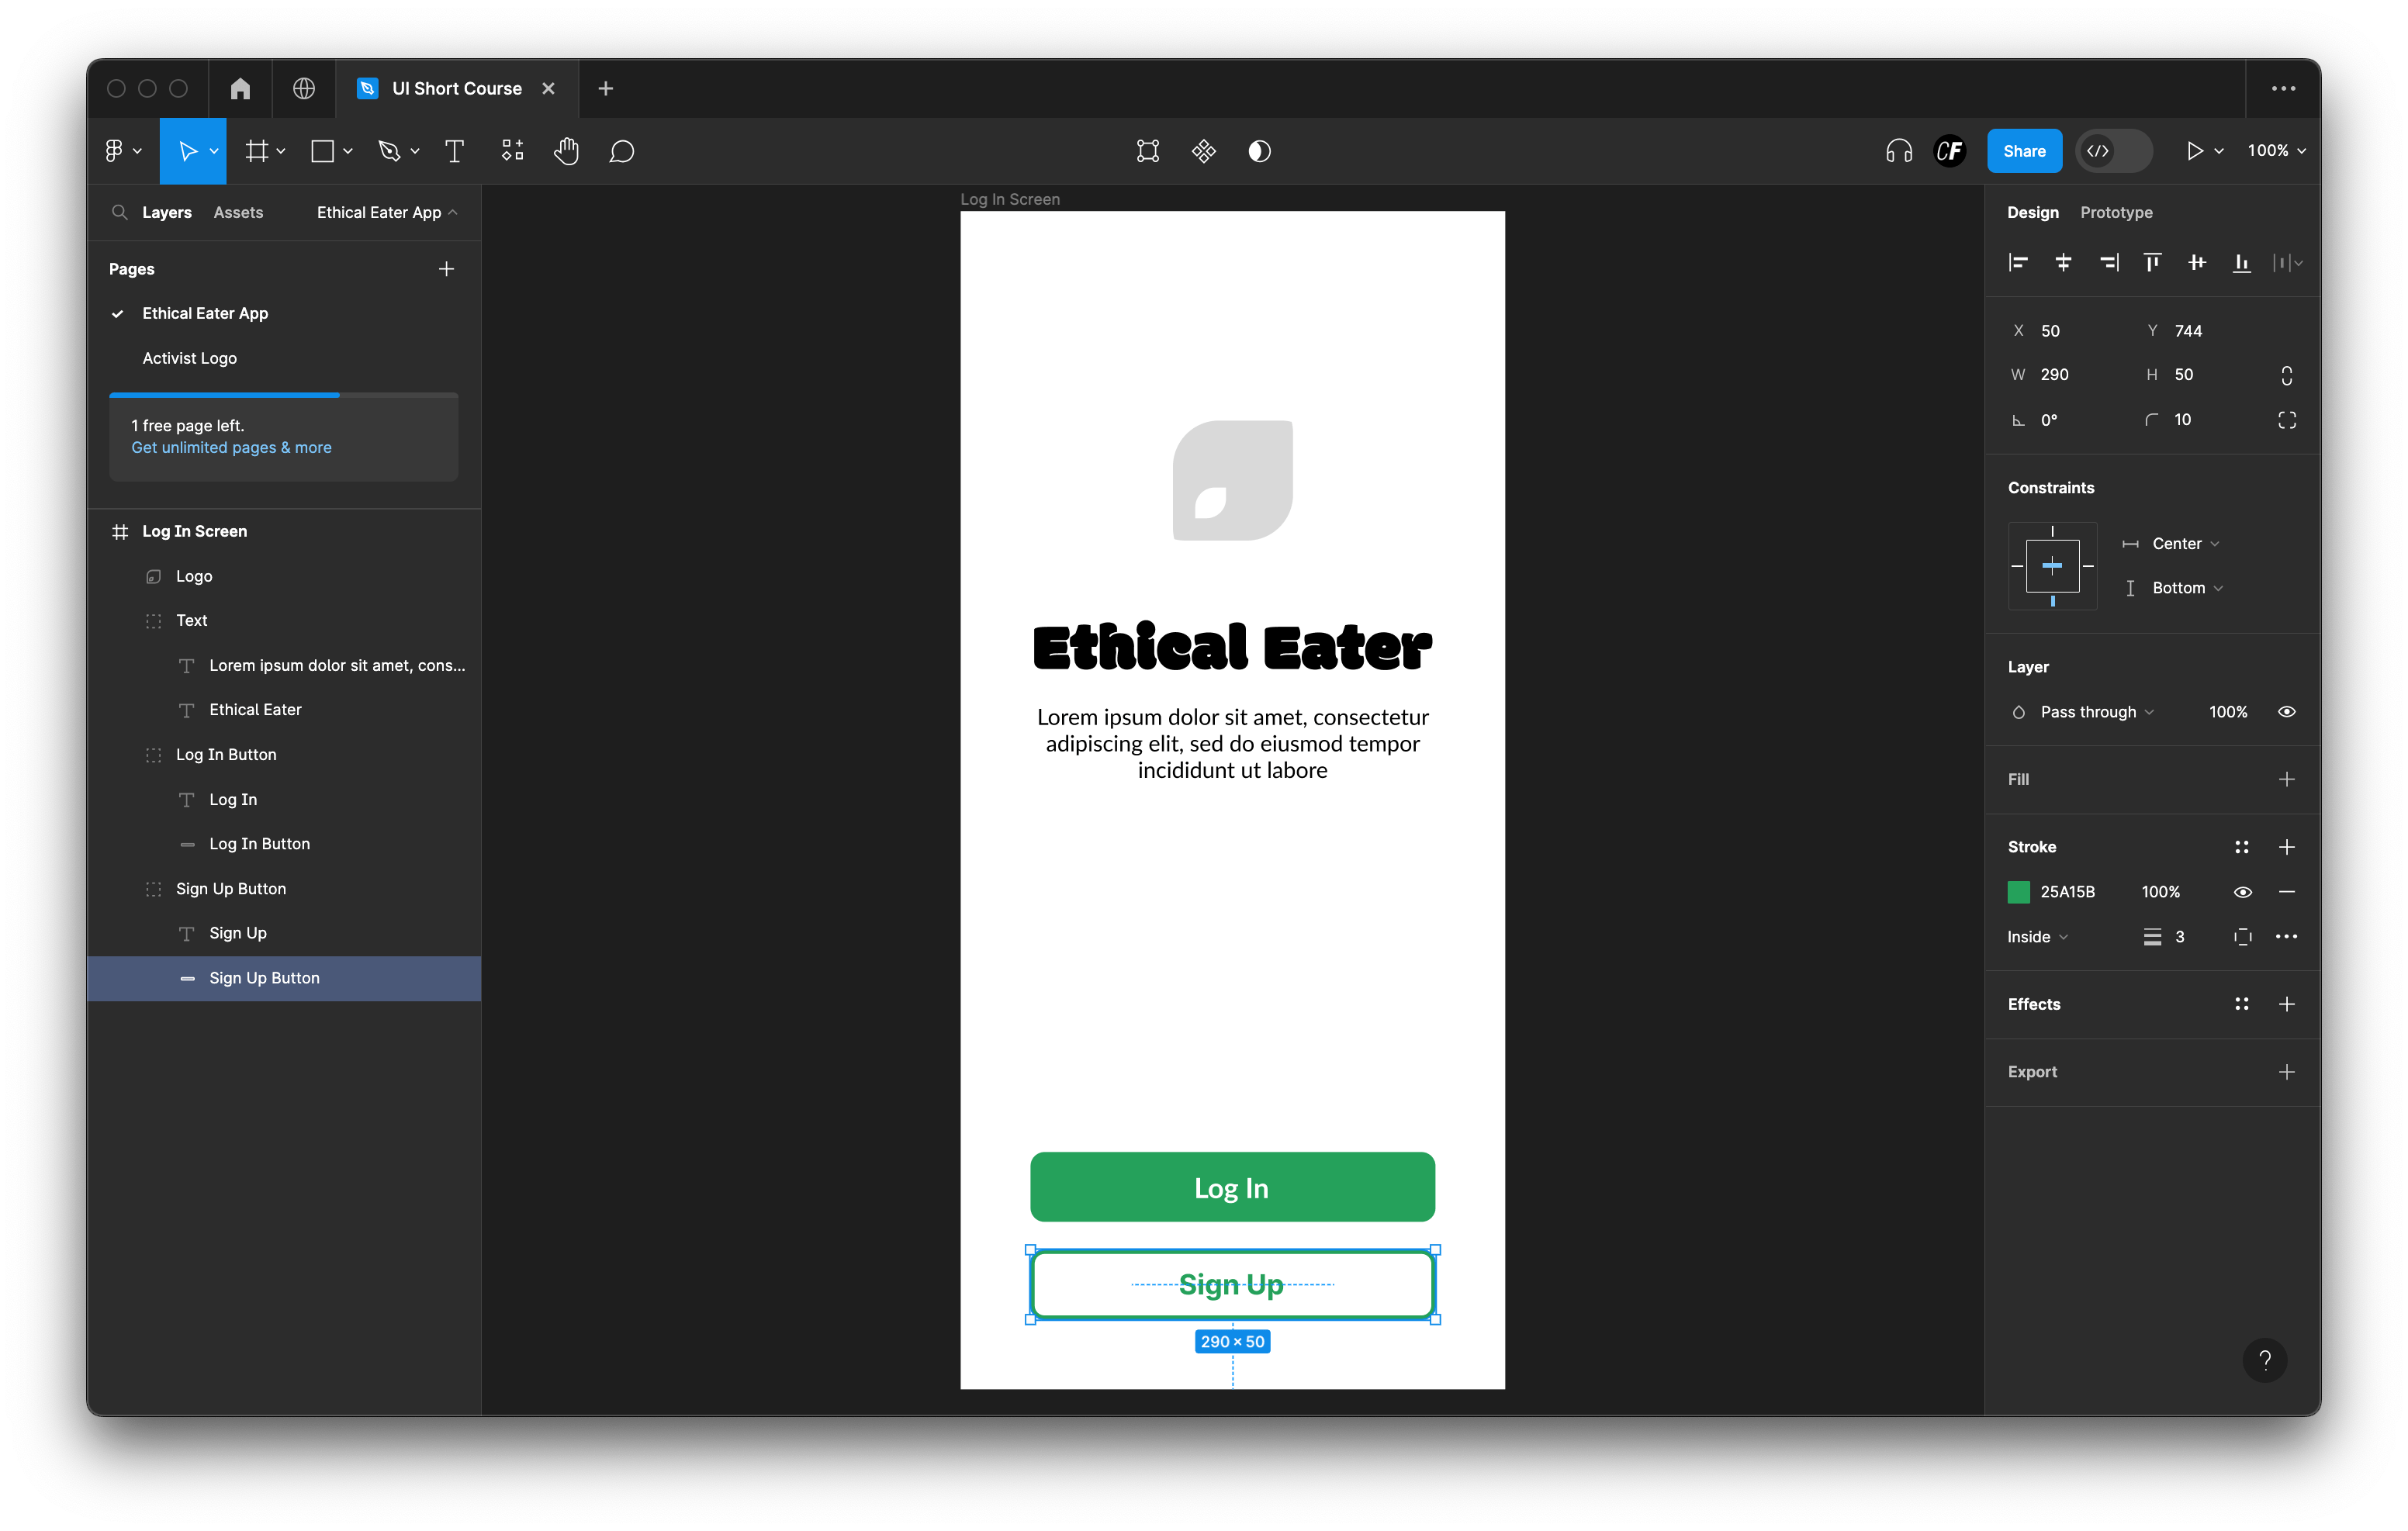
For some of your shapes, you’ll only need to color the border, rather than filling in the whole shape with color. Let’s take the sign up button for example. We want this to have a secondary hierarchy (meaning it’s not the first thing the user should notice) so we’ll make it appear visually lighter than the log in button.
Remove the fill using the minus icon next to it (in the right sidebar), and instead add a Stroke. Using the controls under the stroke option, adjust the weight and color until it feels good. You’ll notice we’ve also changed the color of the button text to green, to make sure it’s consistent.
Next up is imagery. Adding an image to your design file is very straightforward; you can simply drag an image from your saved files right onto the canvas. However, this may cause problems, as the image you’ve dragged and dropped could end up anywhere on the page and will likely not be the right size.
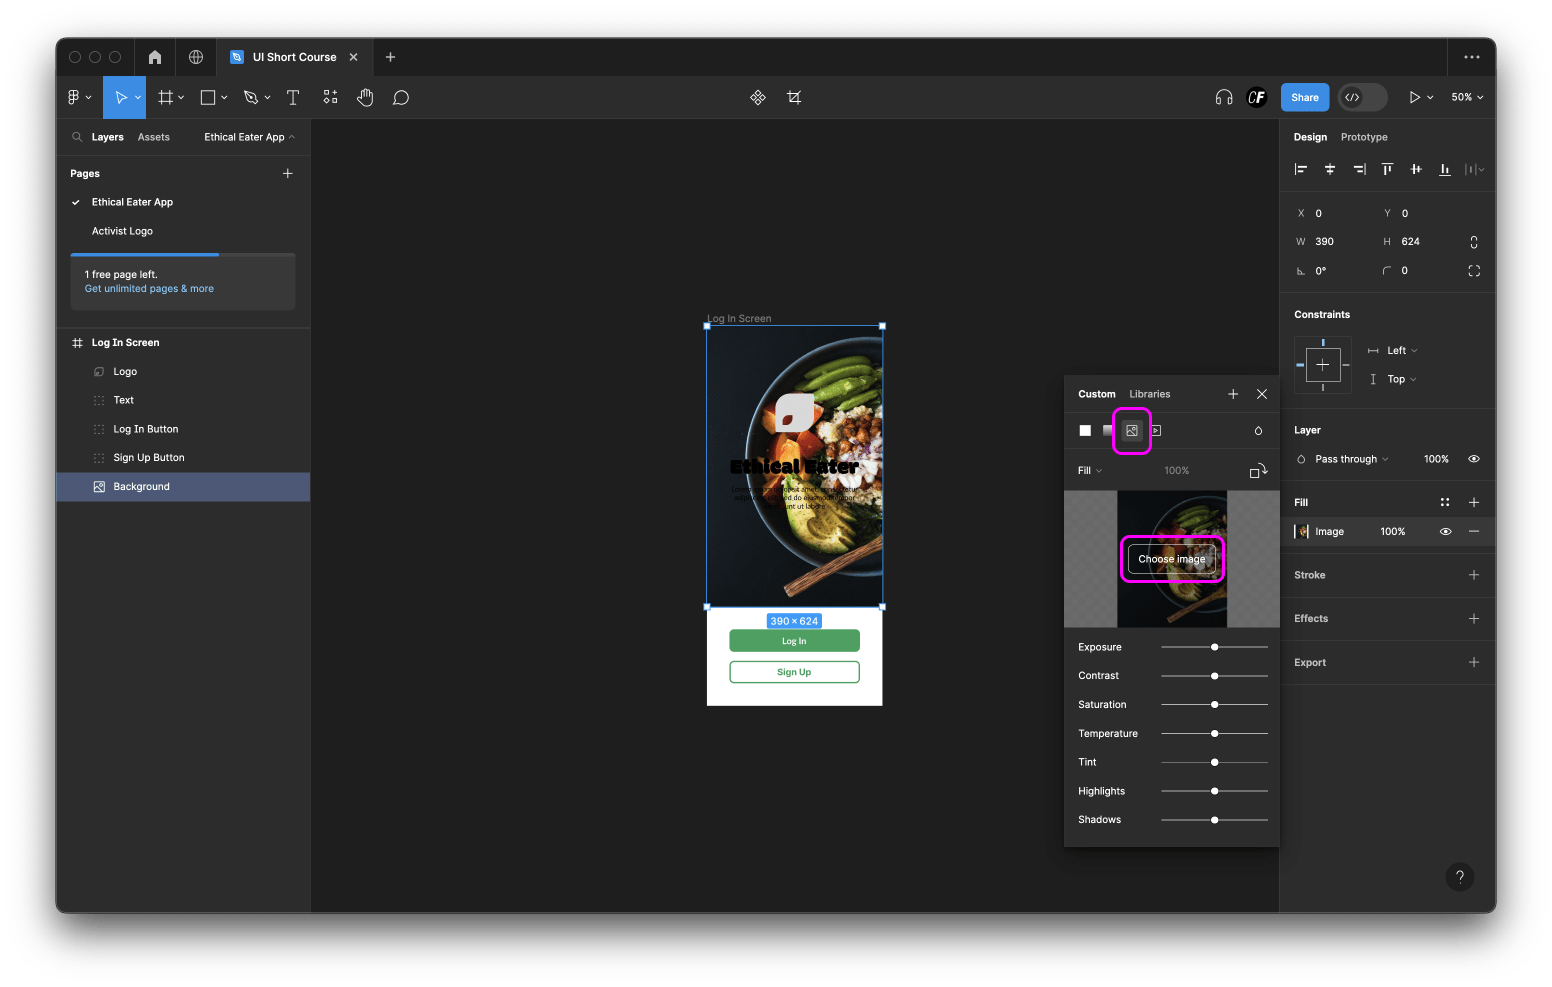
To avoid this problem, you can first draw a rectangle on your design file and position it below the other layers by dragging it down to the bottom of the layers list (in the left sidebar). Think of this rectangle as a placeholder for your image. Adjust its size and position to fill about ⅔ of the frame.
Keeping this rectangle selected, follow the steps for changing its fill color, but notice the little image icon above the color picker. Select it then hover over the checkerboard preview until you see the button Choose Image. This will allow you to replace the fill with any image you have saved to your computer!
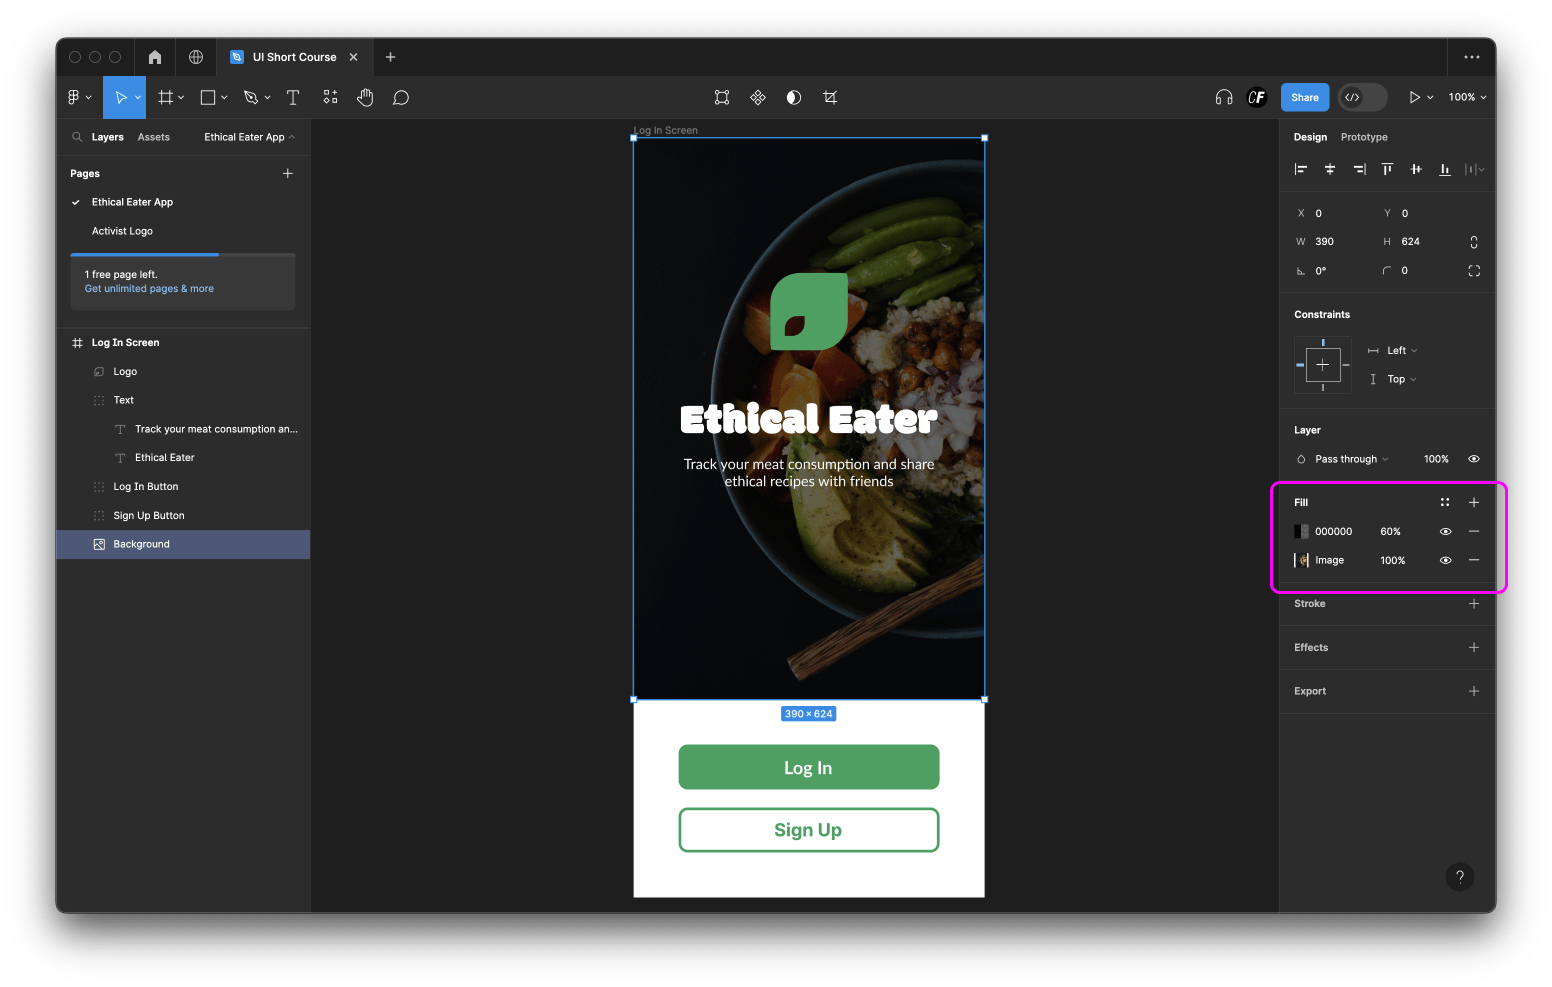
Since there is not a lot of contrast between the black text and the logo against the dark background image, let’s apply a colored mask overlay. This will help make the logo and app name stand out on the screen.
Simply click on the plus icon in the Fill area of the right sidebar to add another layer on top of the existing one that contains the image. From there, you can adjust the color and opacity of the new fill layer until you achieve something that works and looks visually appealing.
We’ve gone for a black fill at 60% opacity, then changed the color of the text and logo so that it stands out against the dark background. Check it out:
It's important to run your work by an accessibility checker to make sure your designs are suitable for everyone. Accessibility checkers measure things like color contrast, text readability, and touch targets to ensure that your design does not exclude anyone with technical or physical disabilities. You can read more about the importance of accessibility and usability in design in this article.
There are plenty of free accessibility checkers you could use, Stark Accessibility is a plugin for Figma you could explore.
6. Saving and exporting your work
Once your log in screen is looking pretty and polished, and your layers are well organised and named, it’s time to export your work!
Select the entire frame by clicking in the left sidebar, then press Export at the bottom of the right sidebar. Choose the file type and size, before clicking Export [name of frame].
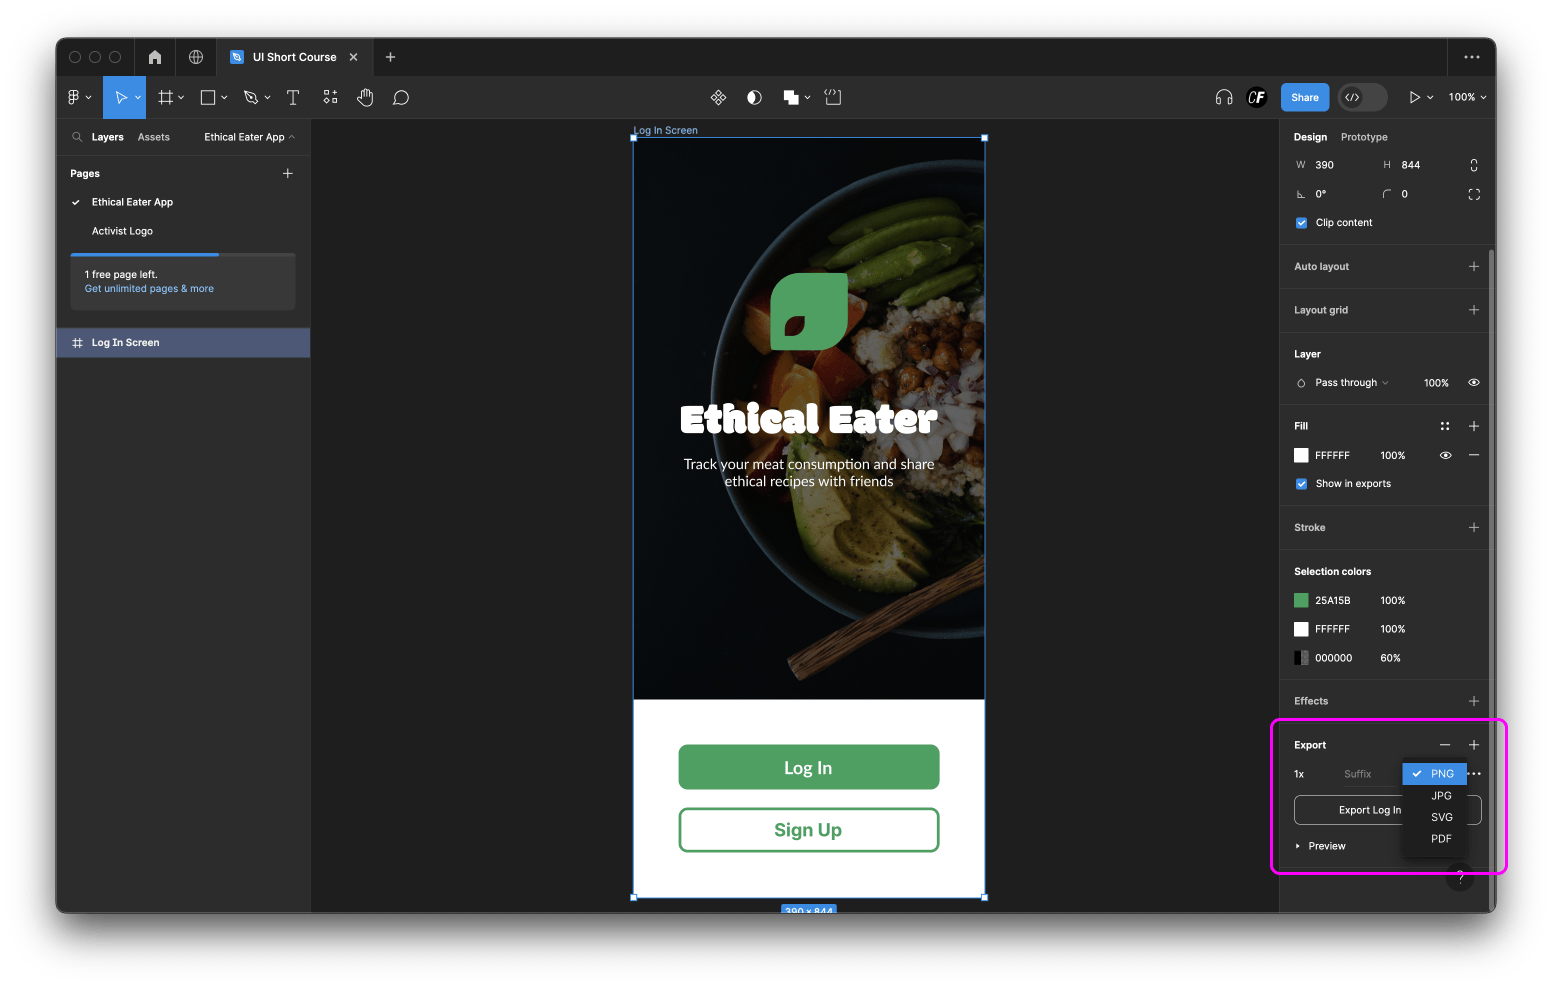
For now, export your designs as a PNG file and you're ready to share your work!
Summary
Congratulations, you've officially designed your very first app screen and completed the UI design short course!
Over the last five lessons, you’ve successfully created a user interface, following each step in the UI design process—from wireframes all the way through to polished product. You also learned the fundamental principles of UI design, including color theory, typography, and hierarchy.
You’ve even learned about some of the best AI tools that could help speed up the UI design process and integrate even more creativity into your work.
You can now share your app screens with friends and family—or with us on Instagram, tagging us @career_foundry!
To put your newfound knowledge to the test, follow this tutorial up with our UI design quiz! It will only take five minutes, and if you get 75% of the answers right, you’ll get 5% off our full UI Design Program!
We hope you’ve enjoyed this short course and that you’re happy with your app screen. If you’ve enjoyed learning all about UI design this week, why not continue your learning with CareerFoundry?
Check out the CareerFoundry blog for loads of great resources and tips about the design industry and what it's like working in tech.
If you’d like to know more about the UI Design Program and studying with CareerFoundry, book a free call with a program advisor. They’ll talk through your previous experience, help you figure out how to become a UI designer, and provide personalized advice on your next steps for a career in tech.
Thank you for taking part in our short course and congratulations once again! We look forward to seeing you again!
