
Hey there! Welcome to Tutorial 3 of your Product Design Short Course 😃
In the previous tutorial, we explored what a product designer does and briefly outlined the product design process. Today, we’ll expand on that outline and take a closer look at what’s involved—from research and ideation to design, testing, and iteration. By the end, you’ll understand the general framework that product designers follow, as well as what happens at each stage.
Here’s the plan for today:
- What is the product design process?
- A closer look at the product design process
- Practical exercise: Reverse-engineering the product design process
Got questions or feedback? Just hit “reply” on any of the course emails you receive. We look forward to hearing from you 😊
Are you ready for a product design process deep-dive? Then let’s get going!
1. What is the product design process?
Whether they’re designing a physical product, a digital product, or an intangible experience, all product designers ultimately have the same goal: to conceive and design products that fill a gap in the target market, effectively solve a problem for the end user, and tie in with business objectives.
As such, most product designers follow a similar process of:
- Research
- Ideation
- Design
- Testing
- Iteration
- Development and launch
- Ongoing product testing and iteration
The product design process considers both the functionality and aesthetics of the product, and it’s closely modeled on design thinking—a user-centric approach to solving complex problems.
The design thinking framework encourages designers to empathize with their users, to clearly define the problem that needs to be solved, to ideate as many solutions as possible, and to prototype and test some of those solutions to identify the most effective, feasible idea.

As we explore each stage of the product design process, you’ll notice that product design and design thinking are closely intertwined. That’s because all great products are inherently user-centric!
That’s the product design process in brief. Now let’s zoom in for a closer look 🧐
2. A closer look at the product design process
As we move through each stage of the product design process, bear in mind that the process isn’t always linear—and that the exact steps and tasks will vary depending on both the nature and maturity of the product. A product designer responsible for creating a brand new product will have a different approach than, say, a product designer looking to improve an existing product.
For the purpose of this course, we’ll explore the process through the lens of designing a new product from scratch—starting with that all-important first step: research!
Research 🔍
Every great product idea begins with thorough research. Research is the key to understanding—your market, your users, and the business goals. Only with a solid understanding of all areas can you begin to conceive a worthwhile product 🙌
There are three main aspects of the research phase:
- Market research
- User research
- Internal research and discovery
Let’s explore each in turn.
Market research
Market research focuses on evaluating the target market—that is, the market in which your product will compete. It includes competitor analysis, exploring industry trends, and identifying gaps and opportunities in the market.
User research
User research focuses on the target audience: the people whose problems you’re aiming to solve. It enables you to understand who your target users are and to empathize with the challenge(s) they face. From there, you can identify what pain-points they need you to address with your product—as well as how they’d like the product to look and function.
There are two main types of user research:
- Quantitative user research—"What happened?" Quantitative research gives you objective, measurable data. For example: how many users completed the checkout process in a 7-day period? Which version of your website homepage got more conversions in an A/B test? How long did it take a particular user group to complete a specific task? Some common quantitative user research methods include surveys and questionnaires, A/B tests, heatmaps, and usability analytics.
- Qualitative user research—"Why did it happen?" Qualitative research gives you subjective, qualitative data. It explores the users’ thoughts, feelings, and attitudes—looking at the "why?" behind their actions. Qualitative research is based on what your users tell you through user interviews, card sorting exercises, and diary studies (to name a few).
📚 Recommended reading: What Is User Research and Why Is It So Important?
Internal research and discovery
Product designers must also understand the business context surrounding their work. What is the overarching vision for the business, and how does this inform the product vision? What strategic objectives should the product help to achieve?
This phase might include collaborating with the product manager or product owner to understand the product vision. Product designers may also meet with stakeholders from other departments to determine what (business-related) needs and goals the product should fulfill.
By the end of the research stage, the product designer should have a clearly defined user problem they want to solve—as well as a thorough understanding of the market they’re hoping to conquer and how they are contributing towards business goals.
Ideation 🧠
The next step in the product design process is ideation. This involves consolidating what you’ve learned in the research phase and coming up with potential solutions to the end user’s problem.
At this stage, product designers are encouraged to innovate, be creative, and think outside the box. This is the moment to let your imagination run wild! As stipulated in the design thinking methodology, the ideation zone is a judgment-free zone 🤩
In practical terms, ideation is the process of generating as many different solutions and ideas as possible. It’s usually done collaboratively through workshops and group brainstorming sessions. Ideas may be visualized and documented with moodboards, storyboards, rough sketches, and mind maps—anything that helps to capture and communicate the concept.
📚Recommended reading: What Is Ideation in Design Thinking? (Including Useful Ideation Techniques)
Ideation should remain user-focused throughout, centering the end user’s needs, goals, and preferences. But, as you consider which ideas to take forward, it’s important to balance those user needs against business goals—and to consider what’s feasible and viable.
By the end of the ideation phase, the product designer should have one or two promising concepts they want to develop further.

Design 🎨
This is where the product design process shifts from ideating and conceiving to designing and implementing. In other words, it’s time to get hands-on!
At this point, the product designer will take the most promising idea (or ideas) from the ideation stage and start to bring it to life. The product usually goes through various iterations, evolving from rough sketches and mockups to low-fidelity wireframes and, eventually, a more detailed, life-like prototype.
📚Recommended reading: What's the Difference Between a Wireframe, a Prototype, and a Mockup?
Note that the design stage really varies depending on the product in question. For a digital product such as an app or a website, the product designer will consider things like:
- Information architecture—how content is structured and organized across the product
- Navigation and user flows—how will the user navigate the website/app and what steps will they take to complete their desired tasks?
- UX writing and microcopy—what messaging will feature throughout the product to guide the user?
- The UI design of the product—the visual and interactive properties that determine how the website/app looks and functions
- The overall usability and user experience (UX)—is the product intuitive and easy to use? Does it provide a seamless, friction-free experience?
- Responsive design—how the digital product displays and functions across different devices and screen sizes
- Accessibility—ensuring that the product is inclusive of, and accessible to, all users, and that it adheres to Web Content Accessibility Guidelines
For a physical product like a vacuum cleaner or a coffee machine, the product designer will need to take additional factors into account, such as:
- The materials that will be used to build the product
- The physical structure and ergonomics of the product—what’s the optimum size, shape, and form for the product?
- User safety and comfort while operating or interacting with the product
- The environmental impact of the product—is it sustainable and energy efficient?
Just like digital product designers, designers of physical products must also consider the overall usability of the product and the user experience it provides.
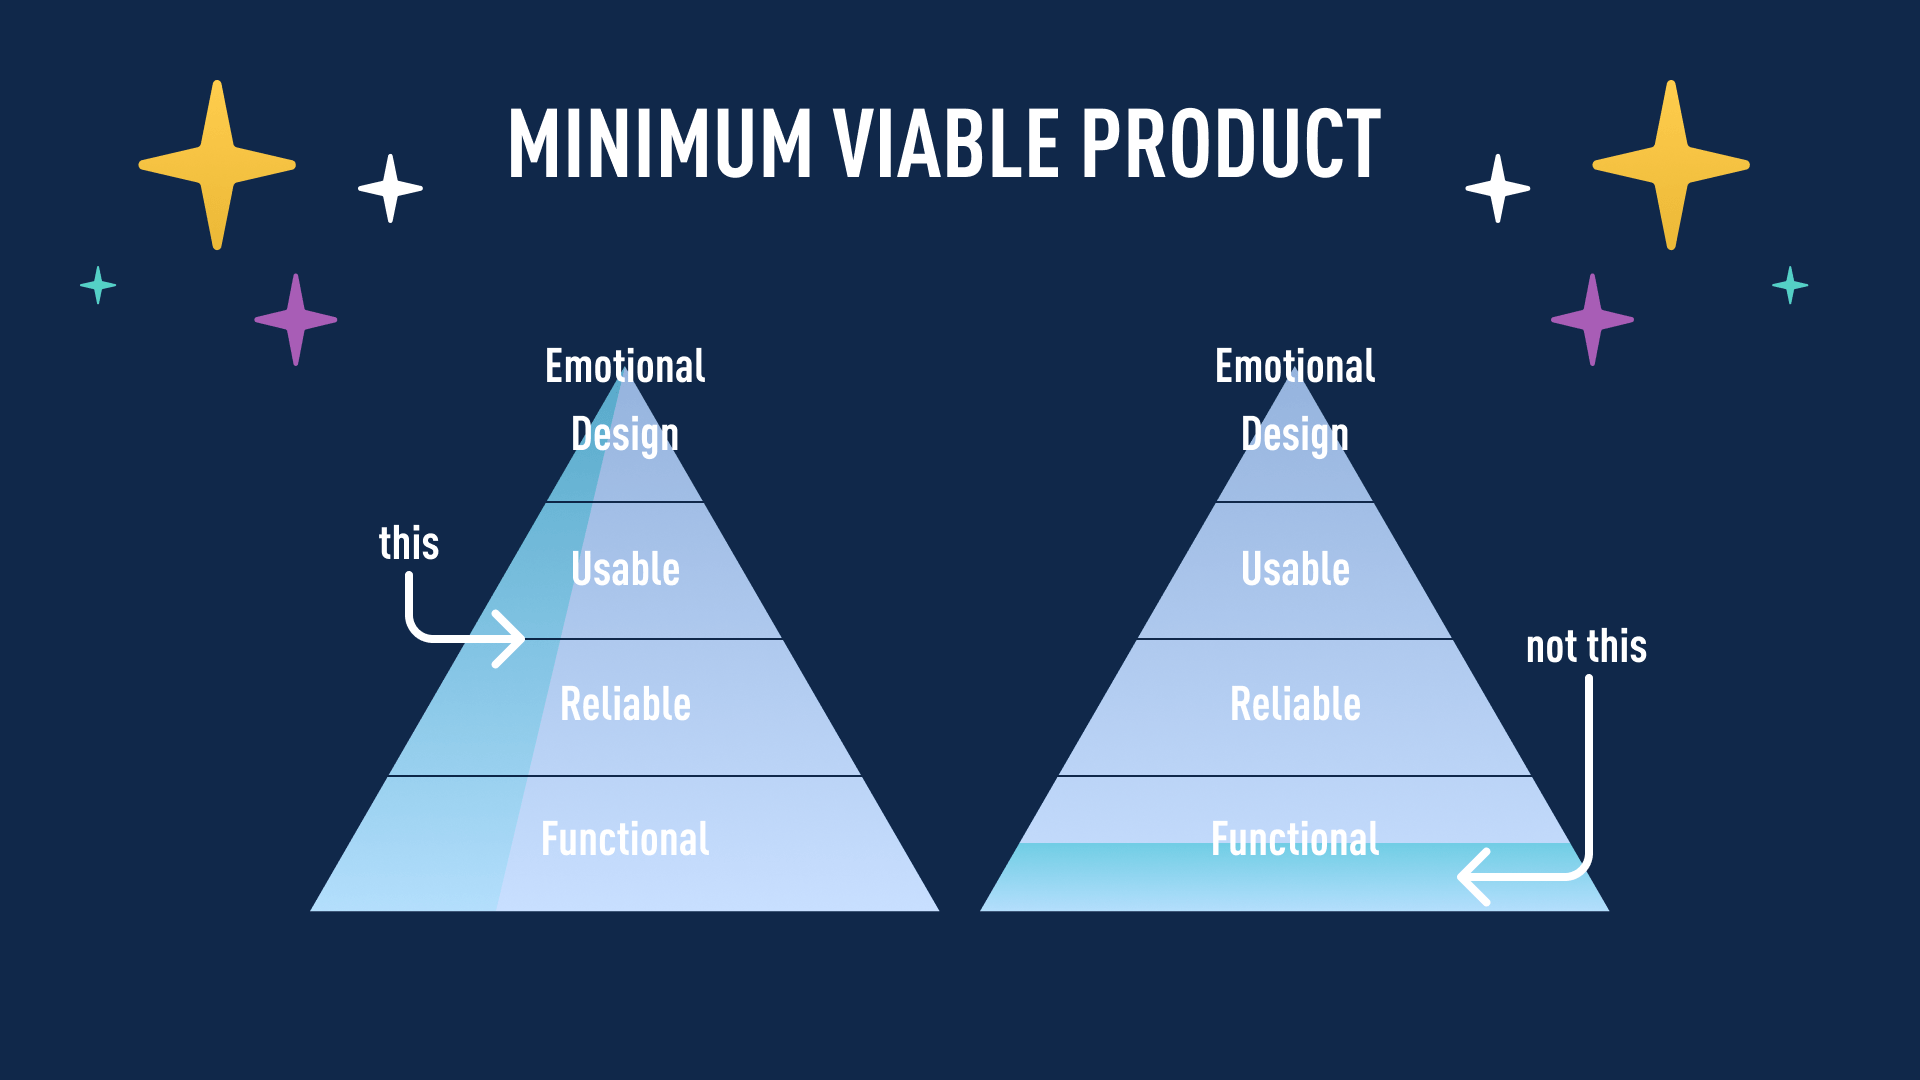
The design phase usually results in an MVP (a minimum viable product). This is essentially a basic, no-frills version of the product that can be tested and refined before the concept is fully developed.
For digital products, the MVP usually takes the form of a high-fidelity interactive prototype—a working model of an app or website that a user can actually click on and interact with. For physical products, you might develop a 3D printed prototype or put together a simple product mockup.
Testing 🧑🔬
It’s essential to make sure that the product functions correctly before you go through the process of getting it developed ☝️ And that’s what the testing phase is all about.
With your MVP or prototype to hand, you’ll test your product on real people—ideally a group of people who closely represent your target users.
This is known as usability testing. You’ll ask your product testers to complete specific tasks with the product, observing them directly as they do so or recording the session and watching it back later. Usability testing can also involve supplementary interviews to get qualitative feedback from your users.
Additionally, the testing phase might include design reviews with internal stakeholders and other teams. This is useful for evaluating the product from different business perspectives and weighing it up against strategic objectives.
The testing phase is critical because it allows you to identify and fix usability issues and design flaws before the product goes live. This doesn’t just save time and money; it also ensures that your product has the best chance of success when it finally hits the market 💸
Iteration 🪄
The testing phase usually highlights several design issues and product pain-points. It sometimes sparks brand new ideas, too!
Based on the feedback and insights gathered, you’ll make changes to the design—iterating until you reach a near-perfect version. And, depending on the extent of the changes, you might run further tests to validate the product before taking it through to development.
Once the design has been deemed functional, usable, and aesthetically pleasing from a user perspective ✅ as well as feasible and viable from a business perspective ✅ it’s ready to be built!
Development and launch 🚀
The penultimate step in the product design process is to hand the design over for development and launch.
Be it a digital product or a physical one, the product designer must essentially share the final designs (for example, high-fidelity prototypes), the technical specifications for the product, and any related documentation with the development team—be that a team of software engineers or physical manufacturers.
This step might involve presenting your work to key stakeholders (such as product managers and developers), sharing design assets in the relevant format, and running through any specific guidelines the developers/manufacturers should follow when building the product.
Ongoing product testing and iteration 🔁
The product design process doesn’t stop once the product is live. Oh, no—any product designer worth their salt will continuously monitor the product’s performance and look for opportunities to fix, improve, and update the product.
Ongoing product testing comprises anything from A/B tests and product experiments to gathering user feedback through surveys, regular usability testing sessions, and continuous market research.
You can’t just sit back once your product launches and hope for the best. You must ensure that the product maintains its competitive edge and evolves in line with user needs and market changes. A product designer’s work is never done! 😅
Phew! That was quite a deep-dive. We’re nearing the end of Tutorial 3 now—and what a journey it’s been! We hope you’ve enjoyed exploring the product design process and imagining what it’s like to work as a product designer 😍
As always, we’ll finish today’s tutorial with a practical exercise. You've got this! 🙌
3. Practical exercise: Reverse-engineering the product design process
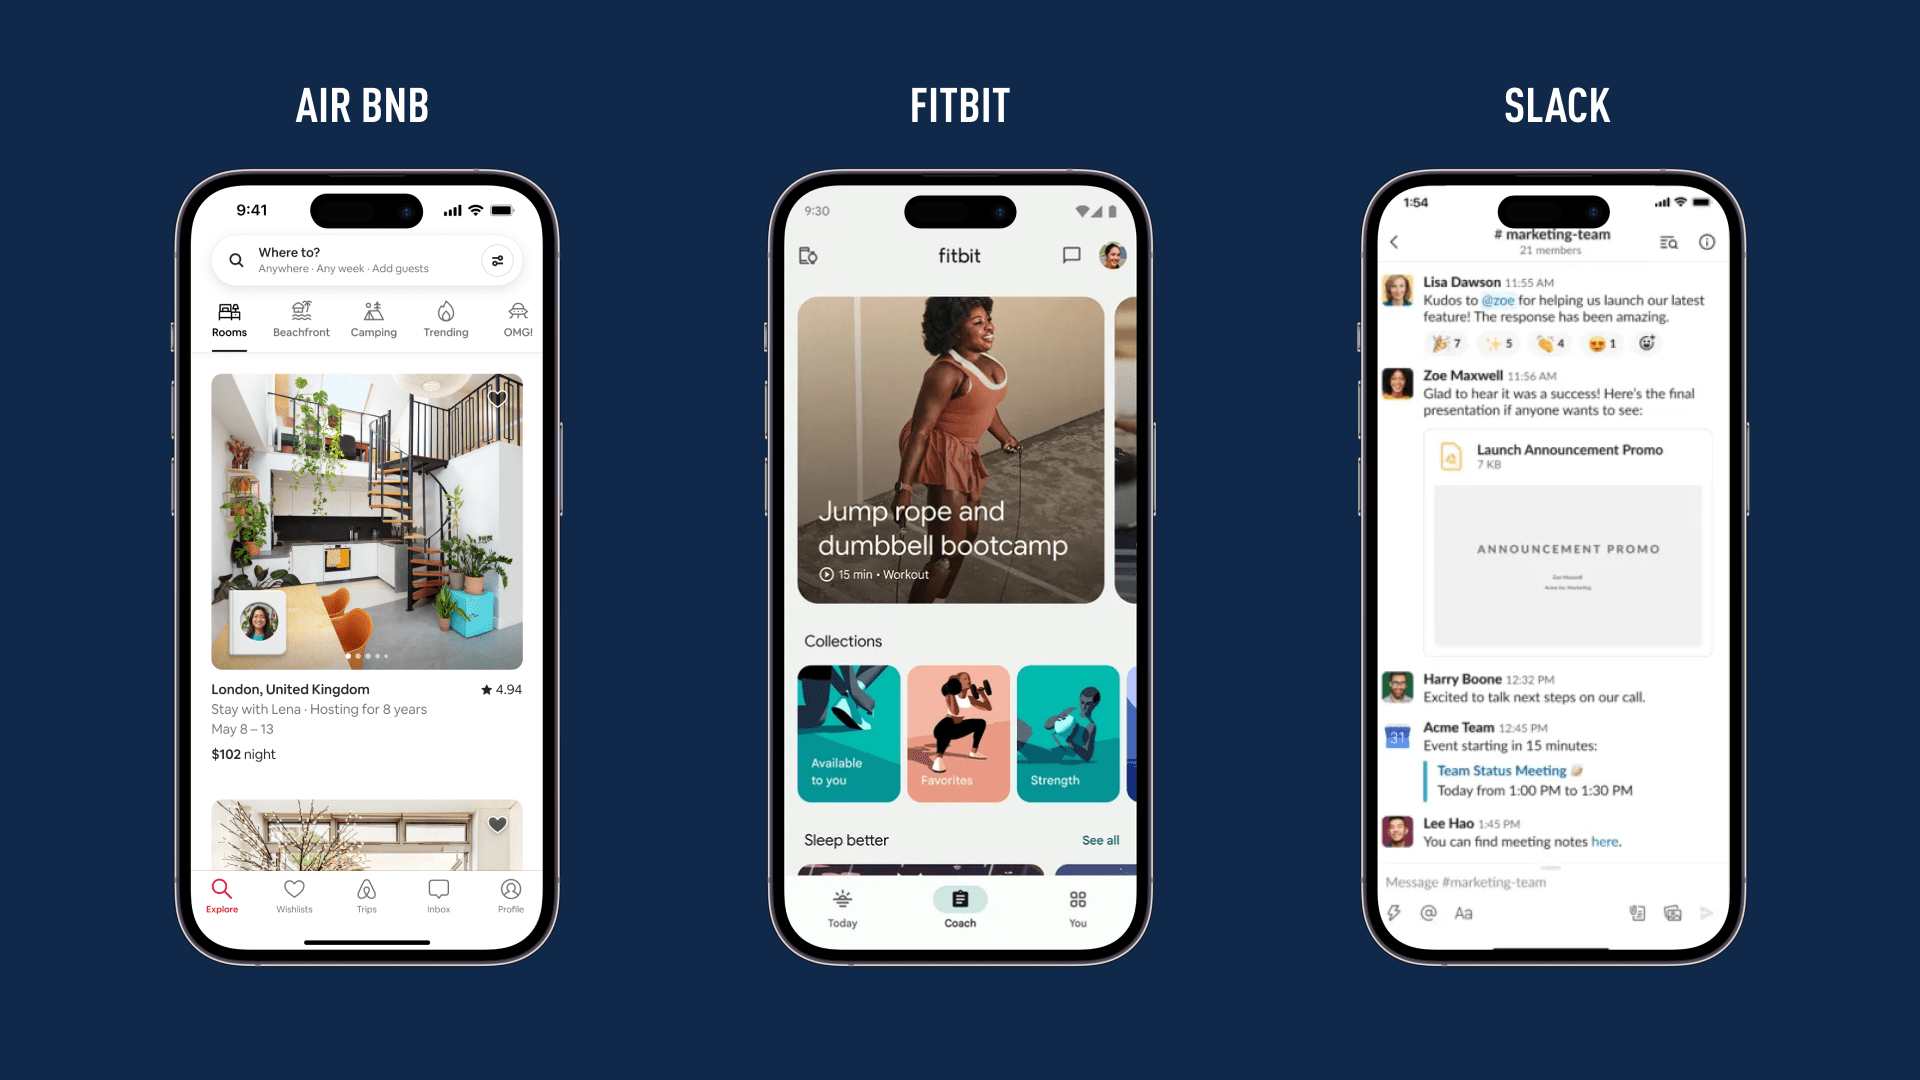
Now you’re familiar with the product design process, you’re going to consider it through the lens of a well-known product. First, choose one of the following products to focus on:
- Airbnb, the online marketplace for vacation rentals
- Fitbit smartwatch/health and fitness tracker (any model!)
- Slack, an instant messaging and communication platform
With your chosen product in mind, you’re going to reverse-engineer the product design process to envision how that now-famous product came into being. Consider each of the stages we outlined throughout this tutorial and reflect on the following:
- What gap in the market do you think your chosen product was designed to fill? What user problem was it built to solve? Who are its main competitors?
- Who do you think are the target users for your chosen product? Sum them up in just two or three sentences.
- Note down all the functions, features, and design elements of your chosen product that provide evidence of user-centered design. How does each element serve the end user’s needs?
- Select one key feature or functionality the product offers—for example, the ability to find and book a room in someone’s apartment (Airbnb), to track a period of exercise and review the stats afterwards (Fitbit), or to create dedicated messaging channels (Slack). Now sketch out a user flow for that particular function, mapping out all the steps the user would take to complete a specific task/use a specific feature.
- Just for fun: research your chosen product further to see if you can uncover any interesting updates, fixes, or iterations the product has gone through over time.
Don’t get too hung up on finding the perfect answers. The main goal is to think like a product designer and consider a familiar product through the lens of the product design process—imagining how it evolved from a user problem to an idea to a fully-fledged (and highly successful!) product. 💁
It’s a wrap!
That officially concludes Tutorial 3—and marks the halfway point of your Product Design Short Course. We’ve covered a lot of ground so far! 😵 And there’s still plenty to come. Tomorrow, we’ll look at the main tools used in product design and explore the role of AI. We’ll see you then! Oh, and don’t forget to take the quiz before you go 🤩