
Welcome back to your UX Design for Beginners Course! Now that you understand the goals and structure of this course, it’s time to dig into the design process.
By the end of this tutorial, you’ll:
- Be familiar with first two stages of the design thinking process
- Understand some key user research methods
- Craft your own HMW statement to guide you for the rest of the course
Here’s what we’ll cover:
- Quick review
- Empathize and define: An introduction to the first two stages of the design thinking process
- How to define the “problem” in UX design
- Summary
- What to do now
1. Quick review
The course introduction gave you an overview of the design thinking process, but let’s make sure it’s fresh in your mind.
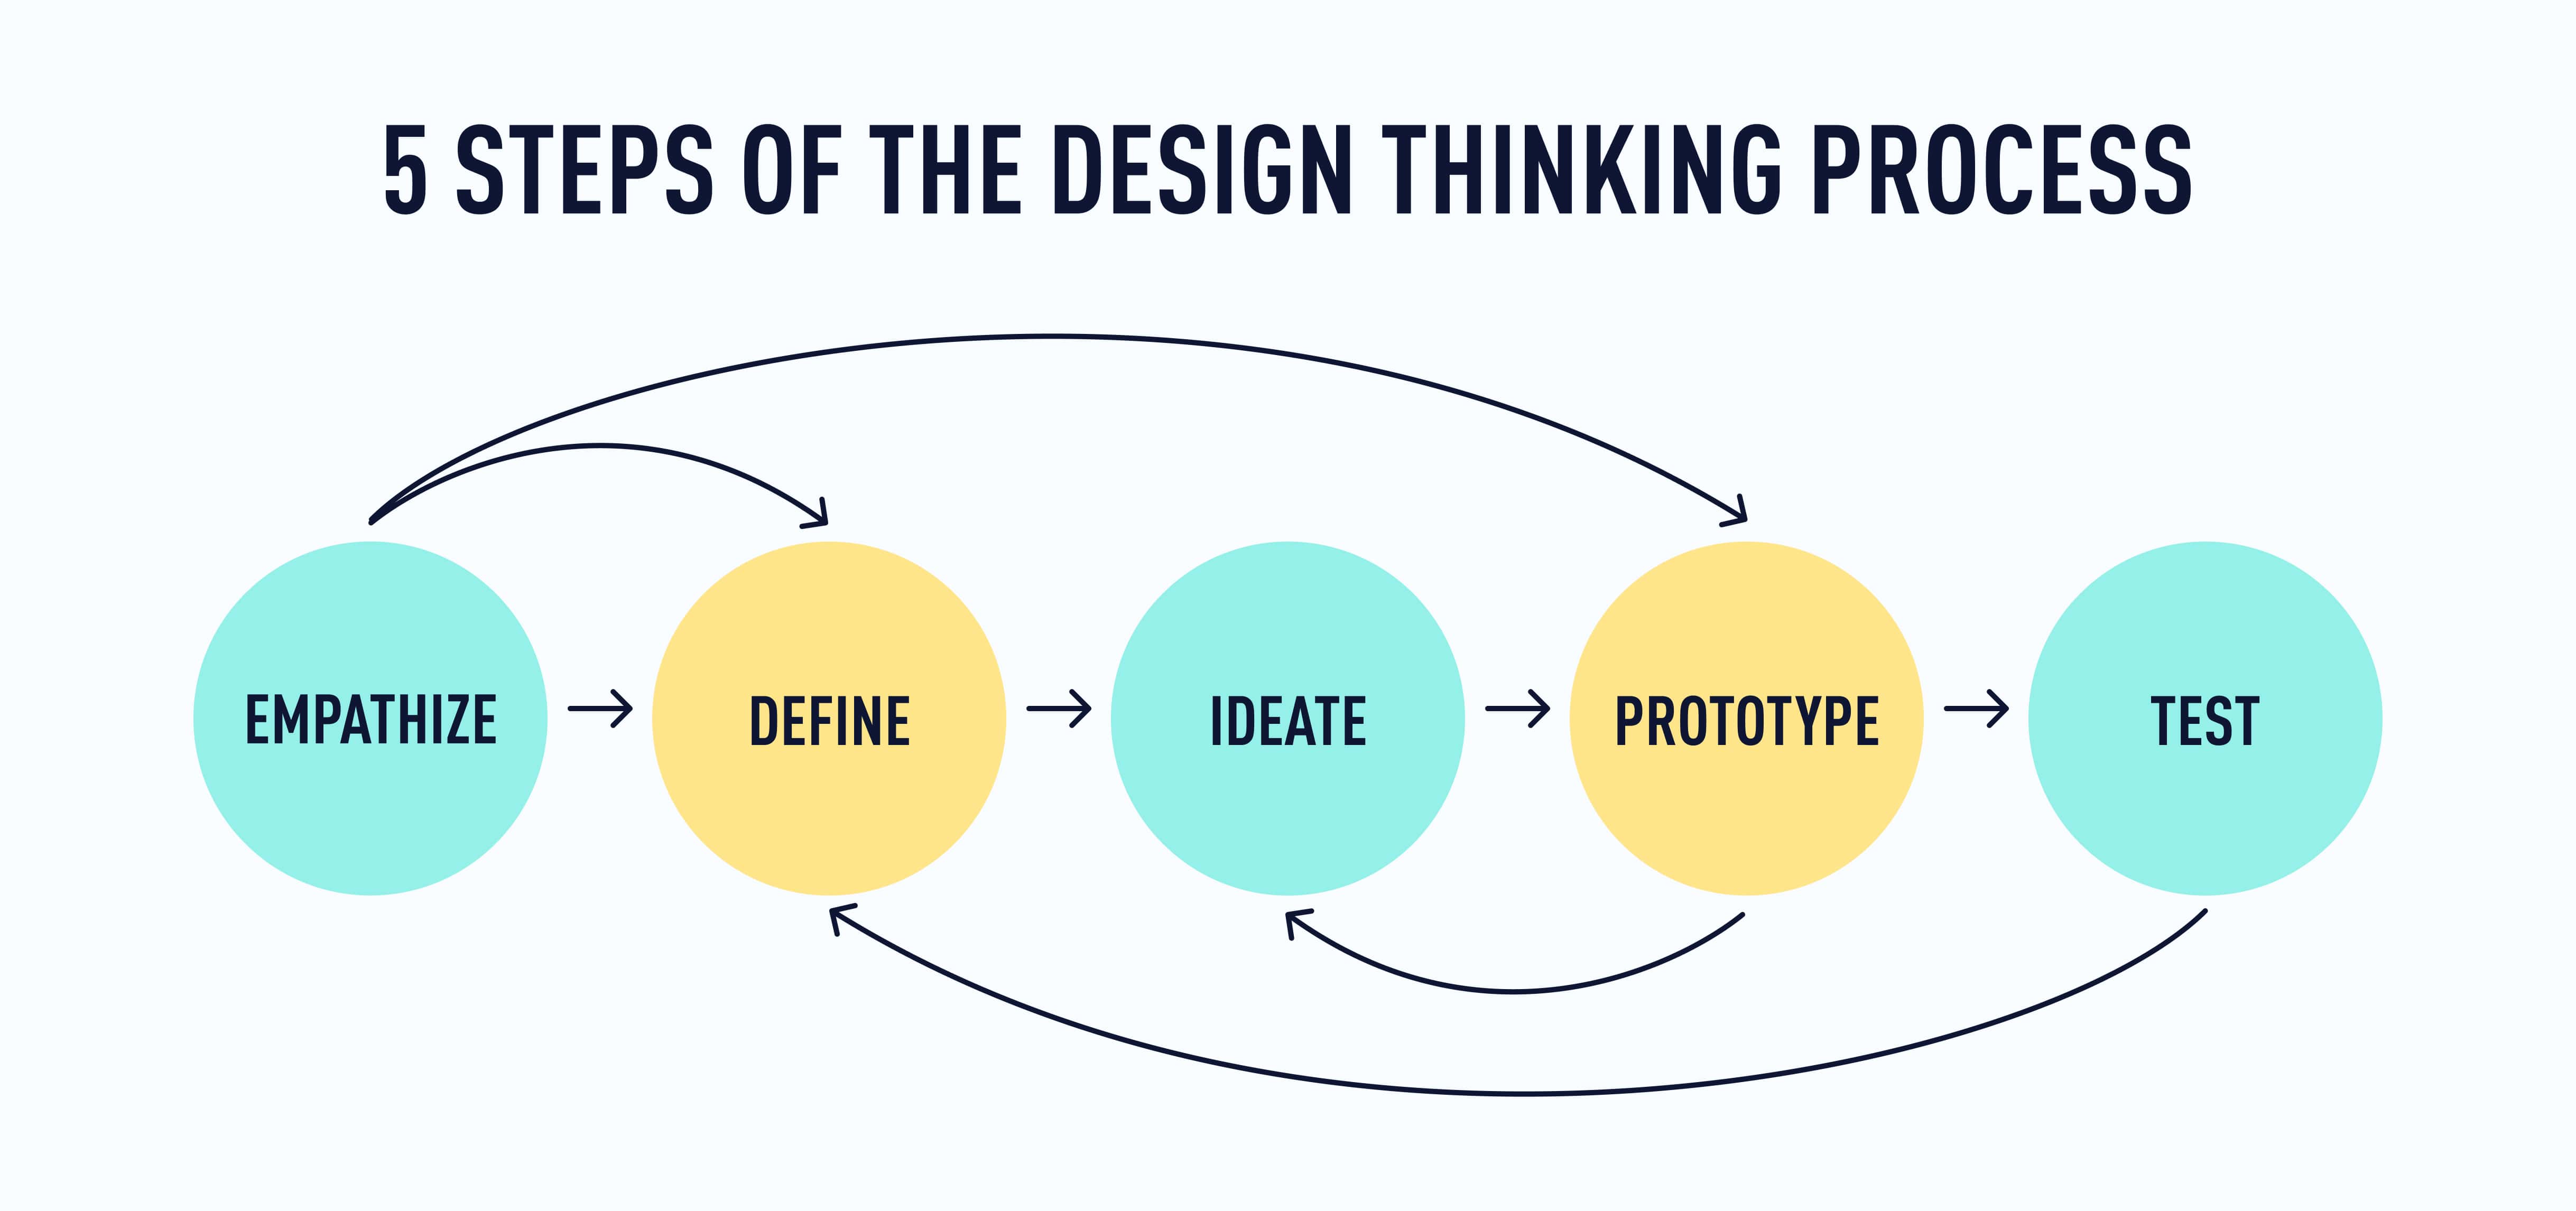
The design thinking process is made up of five stages: empathize, define, ideate, prototype, and test. While the process for any given project will almost always require work in each stage, it won’t always happen in this order, and you’ll usually find yourself taking projects back to one stage or another.
Remember the meditation app example in Tutorial 1? 🧘 Just because you’ve finished the testing stage doesn’t mean you won’t do more research, prototyping, and testing until you have the designs ready to go! The idea is to keep iterating and improving until you find just the right solution for your users.
For UX designers, the design thinking process becomes second nature—so it’s less of a sequence to follow and more a state of mind or an approach to looking at (and improving) user experiences. However, when you are first beginning your journey into UX design, it can be helpful to follow the process in a particular order.
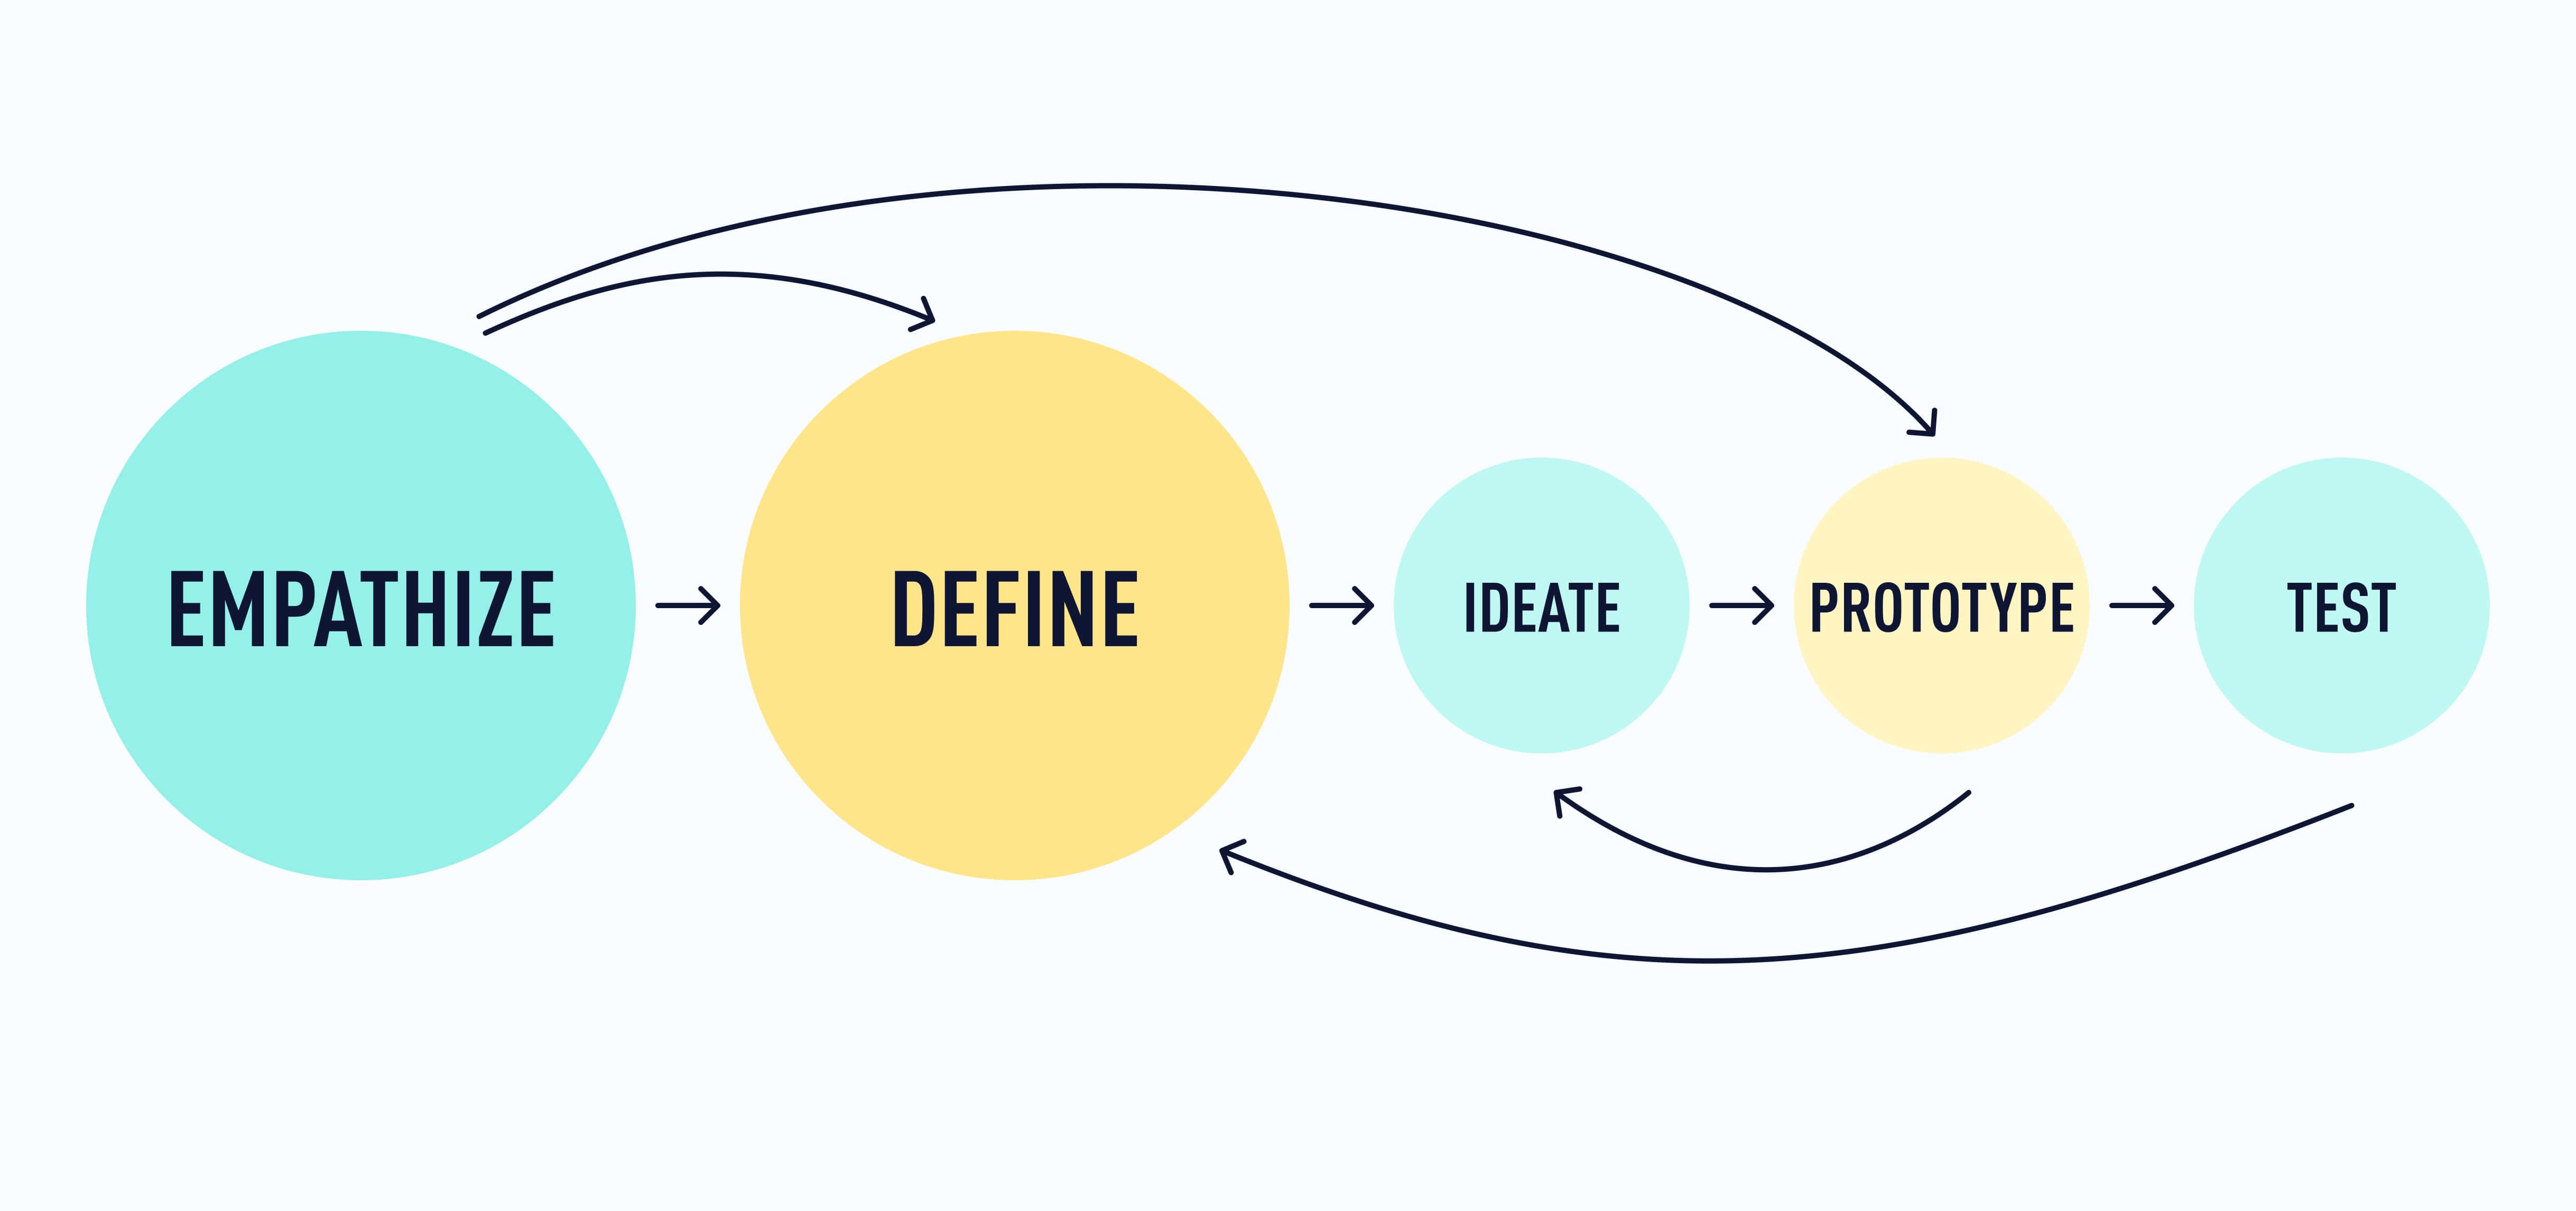
In this UX design tutorial, we’re going to look at the first two stages of the process: empathize and define.
2. Empathize and define: An introduction to the first two stages of the design thinking process
Let’s start with a brief summary before we take a deeper dive into each stage.
In the first stage of the design thinking process, the focus is on connecting with the needs, goals, and pain points of the people who (will) use the product you’re designing. In other words, instead of taking a wild guess at how you should design or improve a product, you find out from the people who use the product what the real problems or pain points are by conducting research. This will allow you to empathize with your audience, meaning you can understand the problems the user is facing. Once you’ve cultivated this empathy and have a clear understanding of where your users are coming from, you can move on to the next stage.
In the second stage you can more clearly define the problem, goal, or pain point that will guide your design process. The goal here is to be able to determine the problem as specifically as possible without limiting the solutions you might come up with in the next stage.
It’s not uncommon for the lines between these stages to get a little blurry. Sometimes, the problem becomes clear as you’re researching or as you’re distilling research data into deliverables like user personas or journey maps (we’ll talk more about this in a moment). Other times, the problem will become clear in a design thinking workshop, just as you start brainstorming ideas. And sometimes, the problem (or your understanding of it) will change later on in the design process, prompting you to go back and research or ideate some more—and that’s okay!
Working alongside AI
In the previous tutorial, we touched on the impact AI is having on the UX industry. It’s a hot topic in the field right now, so you might be wondering how AI can be used in areas like the design thinking process.
It’s always been the mark of a great designer to be able to analyze past and present data and predict and understand the user’s behaviors and needs. And while AI has the ability to analyze large amounts of data and create quick and effective prototypes, it still lacks the wherewithal to tackle the sensitive challenges that someone who actually lives the human experience can understand.
UX designers will still be needed in order to determine what problems need solving, what the right questions to ask are, and apply empathy to user challenges involving illness, disability, finances, and family, for example. AI will definitely make the job of UX designers faster and easier as they’ll be able to hand off most of the data analysis to AI systems and put more energy into their designs.
But there are many issues that arise that AI systems can’t fix, that they actually cause, or that simply need the human element to be solved.
Above all else, bear in mind that AI is there to assist you, not replace you ✨ UX designers must always rely on their own creativity, expertise, and emotional intelligence. They’re designing products for humans, after all—and no one can understand humans better than, well, other humans! 🧑🤝🧑 That’s why empathy is at the heart of UX design! Let's dive into it…
Empathy in UX design
There’s a reason why the design thinking process starts with empathy. Empathy is absolutely essential to UX design. In fact, without empathy, UX design simply doesn’t exist.
Why? Because great user experiences come from listening and understanding the needs of the people who will use or engage with the product you’re designing.
Have you ever used an app or website and gone away from the experience feeling really happy, satisfied, or even delighted by it? More than likely, the designers behind that product took the time to really understand what their users wanted from the experience.
Great user experiences rarely happen by chance! They are the result of an intentional and iterative process, with empathy at its foundation. Of course, business goals are also a factor, but the best UX designers know how to strike a balance and keep their users at the front and center of design decisions.
So what does empathy look like in UX design? Two words: user research.
User research puts UX designers in touch with people who actually use the product, and provides insight into users’ needs, goals, pain points, and contexts. This research can take many forms, both qualitative and quantitative. Here are a few methods that are most commonly used by UX designers (not by any means an exhaustive list):
- User interviews (by far the most common)
- Focus groups
- Shadow sessions
- Diary studies
- Analytics
- Mouse heatmaps
- Funnel analysis
- Cohort analysis
- A/B testing
User surveys are another common research method in UX design, and can be used to gather both qualitative and quantitative data. Because most survey platforms (Google Forms, Survey Monkey, etc.) will translate survey results into graphs and charts, you can turn even the most subjective and non-numerical data into something more measurable when you need to.
So how do you know when to use one research method over another? The best research method(s) to use will vary depending on:
- The type of product you’re working on
- Where the product is in its life cycle
- Who your users are and how much they’re willing to be involved
- Your (team’s) deadlines, capacity, and budget
- What you need to learn about the product and how your users engage with it
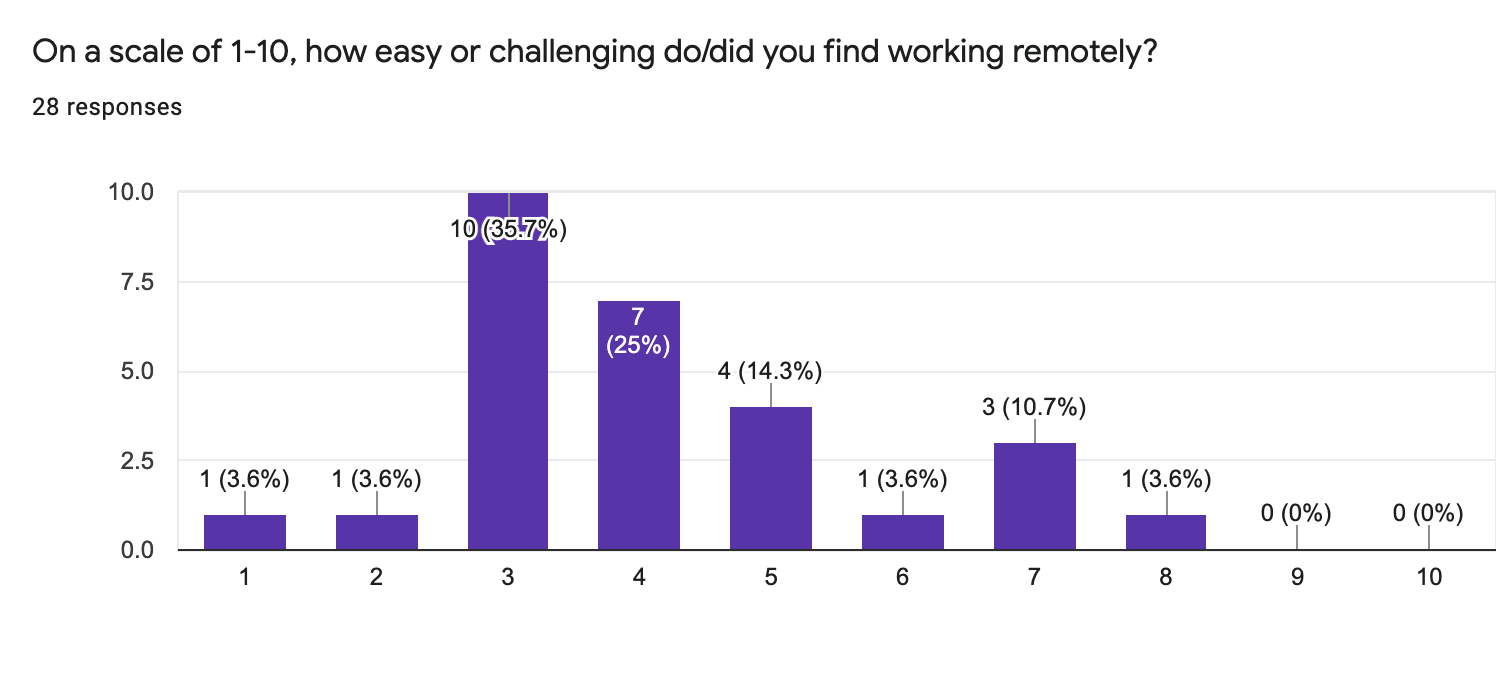
For the purposes of this course, we’ll focus on data from a user survey. Here are some example user survey results for one type of user group: People who work from home. Take a look at the results and see what you notice. You can either view them under this link, or dive into the data yourself with this downloadable csv. file.
 Once the research is done and you have a good sense of users’ needs, goals, and pain points, it’s time to comb through the results and sort it all out. One of the most common ways to start sorting research data out into clearly defined categories is through affinity mapping.
An affinity map (or affinity diagram) takes all the individual notes and insights you uncovered in your research and sorts them into categories in a visual and dynamic way. Affinity maps make it easier to see and understand where the larger or more important problems might be, and to recognize patterns in the data.
For the purposes of this course, it’s not essential that you work through the user research to synthesize the data. We recommend that you at least look through the survey results (and maybe jot down a few things that stand out)—this will help you take the next steps through the design thinking process.
But if you want to get some hands-on practice in research synthesis, here’s an exercise for you: create an affinity map with the data from our user survey. Instructions are in the next section.
Optional practical task: Synthesize user research
So you want to take a deeper dive? Great! Here’s how to create an affinity diagram based on our user survey results—in five simple steps.
Want to see some examples before you get started? We like LucidChart’s affinity diagram example.
Step 1: Get some sticky notes and pens or markers—or set up a board in a free online tool like Miro (which allows you to use digital sticky notes).
Step 2: Go through all of the survey data (or as much as you have time for) and write down individual insights, quotes, and other notes. One note per sticky note. It’s okay if some of these feel repetitive or redundant—that’s part of the magic that will help you spot patterns and trends in the data.
Step 3: Peruse the sticky notes and start to notice similarities, themes, and patterns. For example, you might notice several that mention the challenges of work-life balance, mental health, or child care. Group similar notes together in piles, rows, or whatever makes most sense to you.
Step 4: Add a sticky note over each pile or row that nicely summarizes and labels all the notes in that group. Examples: work-life balance, mental health, child care.
Step 5: For each group of notes, add another sticky note (preferably in a different color) that summarizes your key insight or learning regarding that theme or pattern. Example: “People who work remotely need a way to tend to their mental health that’s time-effective and easy to add to their daily routine.”
And there you have it: An affinity diagram that will help you take the next steps in the design thinking process. Well done!
(If you didn’t complete this exercise, that’s okay—it was optional and you’ll still be able to complete other hands-on exercises in the course!)
Key deliverables that cultivate empathy and help define the problem
Once the research is done and synthesized, UX designers often create interpretations of the research that are known as deliverables. These deliverables help you, the UX designer, to:
- Access your research data in one or a few “at a glance” formats
- Turn the research data into something that others can easily understand
- Cultivate empathy for your users among stakeholders and other members of your team, and help them understand the nature of the problems or pain points under consideration
Let’s have a brief look at two of the most common deliverables at this stage of the design process: user personas and user journey maps.
User personas
User personas are concise, research-based character sketches or archetypes that represent your users. They’re almost akin to creating a character in a story, only the way in which your character solves their problem in the story, is through your design.
User personas are a great way to synthesize some of your research and turn it into something that is easily understandable. They take what might seem like lifeless, overwhelming, or “boring” research and turn it into something more personal and engaging. Because of this, they’re a useful resource when it comes to cultivating empathy and keeping your users at the forefront of design decisions.
While personas are one of the most widely used solutions for humanizing the design process, they do have their limitations. Designers who include and rely too heavily on demographic information in their user personas, or who create just one persona to represent their “average user,” are likely to limit themselves and the potential of the products they design. Because your users are individuals who change focus, goals, capabilities, and contexts from one moment to the next, it’s important for UX designers to remember that there is no “average user,'' and that designing for a statistical average or majority will limit the potential of the products and experiences you design.
There are a variety of ways that pro designers address these limitations (including the Jobs-To-Be-Done approach and persona spectrums), but for the purposes of this course, you only need to be aware that these limitations exist. And if you’d like to get some practice at creating your own persona to reference as you go forward in the course (completely optional), here’s a guide that will take you through the process (with downloadable templates and inclusive user images): 5 Steps to Create Your First User Persona.
✨ As we mentioned earlier in the tutorial, it's important you learn the fundamentals as a UX designer before adding AI to your toolkit. But there are AI techniques that can support you in the design thinking process. For example, Otter.ai can transcribe and summarize user interviews during the user research phase, and ChatGPT can be used to create personas. It can even imitate your user personas to suggest valuable information you may have overlooked in the creation process. We'll go into more detail about ChatGPT specifically in the next lesson!

Learn more about some key AI tools for UX designers in this video:
User journey maps
User journey maps are another important deliverable in UX design. Journey maps provide a visual overview of how users move through either an entire journey through the product, or through one part of it. These maps can be useful for helping you, stakeholders, and others involved in the design process to see the bigger picture, and to locate problems, pain points, and opportunities.
You don’t need a user journey map to complete this course, but if you’d like to learn more about them—and build one of your own—check out this guide (it comes with a downloadable template): How To Build a Customer Journey Map in 7 Simple Steps.
3. How to define the “problem” in UX design
Finally, let’s take a quick look at the second stage of the design thinking process: define. This is when you clearly and succinctly determine the problem you’ll solve for your users.
Design thinking is particularly helpful in looking for solutions to what we call “wicked” problems. Wicked problems (a term coined by design theorist Horst Rittel in the 1970s) are tricky problems that are somewhat ambiguous, and that often involve many unknown factors. Solving one aspect of a wicked problem often reveals other problems that need to be solved.
By contrast, “tame” problems often have easier or more definitive solutions. That’s not to say that “tame” problems are bad or unworthy of a UX designer’s attention—they are still valid and still require a little work to solve. However, when you approach a wicked problem with design thinking, you find your way into products and experiences with the potential to create change and attract an enthusiastic and loyal user base.
By way of example, one of the many problems that surfaced as a result of the Covid-19 pandemic: how to tend your mental health amid a global pandemic. This is a wicked problem. And it gets even more interesting if it’s a question that companies are asking to find out how they can help their employees, or when you add a layer of specificity to it (e.g., how to help frontline workers tend to their mental health).
One way to help narrow your focus and define the problem is through how-might-we (HMW) statements. This might sound complex, but the process is relatively straightforward. You simply look through your user research (or your affinity diagram, if you created one) and start writing HMW statements related to the problems you see represented. For example, a HMW statement for the wicked problem in the previous paragraph might be:
How might we help frontline workers tend to their mental health on their most intense days?
Now it’s your turn. What are the most prevalent or interesting problems you noticed in the user survey results? Write a HMW statement for 1-3 patterns you noticed (i.e., 1-3 of the groups in your affinity diagram, if you created one).
In case it’s helpful, here are some more specific examples (taken from the user survey results):
- How might we help parents who work from home to find accessible and affordable child care?
- How might we help people who live alone and experience isolation to find connection and support while working remotely?
Now, whittle it down to one HMW statement to focus on for the rest of this course. It might be hard to choose, but pick the one that’s most interesting to you—the one that your brain may have already started generating ideas for!
Think about this statement as you go about your day and start thinking about ways you might solve this problem! We’ll do some ideation in the next UX design tutorial.
4. Summary
- Empathy is absolutely essential to UX design. No empathy = no UX design.
- AI can be leveraged in the UX design process, but UX designers must rely on their own creativity, expertise, and emotional intelligence, and ensure the ethical use of AI technology in their work.
- User research is the most important way to generate empathy and ensure that you’re designing in ways that serve the actual human beings who will use your product.
- Qualitative and quantitative research are useful to UX design, but qualitative research can have a bigger impact in the early stages of the design process.
- Affinity diagrams, user personas, and user journey maps are key deliverables that help UX designers translate their research into actionable insights.
- HMW statements are an excellent way to focus your attention on one “wicked” problem at a time.
5. What to do now
Great job on finishing your second tutorial in the course! 🎉
Did you create an affinity diagram or come up with an amazing HMW statement? Post it on Instagram, and tag CareerFoundry! We’d love to see what you came up with.
Now you’re ready to jump into the next stage of the design thinking process: ideate. We’ll see you in Tutorial 3!